Process capability refers to whether an in-control process is functioning in such a manner that lies entirely within the specification limits, and uses engineering tolerances and/or from the customer’s needs (Ryan 255). Process capability involves two phases: (1) determining how the data are to be collected and collecting the data, (2) selecting one or more indices and performing the computation (Ryan 255).
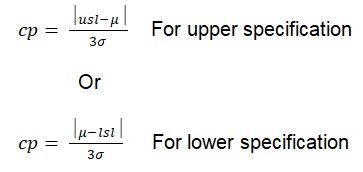
Variation in process capability may occur. Two yardsticks, Cp, and Cpk have become a standard language of quality at its most basic level (Verma, Ajit, and Karanki 262). Cp is strictly a variation index that compares the specification width to the process width” (Fryman 298). The formula for a cp when a two-sided specification limit is present is:

Where: usl = the upper specification limit
Lsl = lower specification limit
6σ = the process width (mean ±3σ)
When evaluating a cp that has a one specification (upper or lower specification) the formula becomes (Fryman 298):
The subject of centering leads to a more useful process capability index as opposed to Cp which only focuses on variability. Cpk is a capability index that considers both the central tendency of the process in relation to the specifications and variability of a process (Fryman 298).

Whereas CP considers only variations, cpk considers the central tendency of the process in relation to both specification and variability (Fryman 298). When using cpk, the process mean should be centrally positioned, as opposed to using cp (Fryman 298).
The most common rule of thumb is that cp should be between 4 and 6 for satisfactory measurement process (Dealy, Saucier 57). When cp is equal to or greater than 1 the process is capable. This illustrates that the process fits between upper and lower specifications (Sahay 2010). Sahay suggests “if the cpk of a process is greater than 1 then the process is at the center, so the process is capable” (7).
Six sigma is a process evaluation model that uses statistical tools to help reduce defects in products(Sahay 6). The six sigma model employs 12-sigmas 6 on each side. In six sigma level, specification limits are known as tolerance and are set during the design of a product (Sahay 6). A process running a six sigma level should produce not more than 3.4 defects per million products.
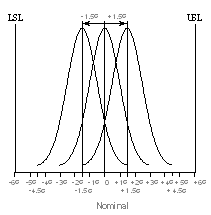
The six sigma level incorporates a 50% variation half of the three sigma level. (Sahay 6)This ensures that the process control. Incase of a 1.5 Sigma deviation the product will stay on course (Sahay 6). A 3-sigma scenario has 6-sigmas 3 on each side. 3-sigma process is sensitive to process change compared to the six sigma process (Sahay 6).
Diagram illustrating Three Sigma Process with 0.0 in the Mean.
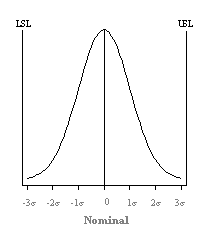
Diagram showing Three Sigma Process with a 1.5 Sigma Shift in the Mean.
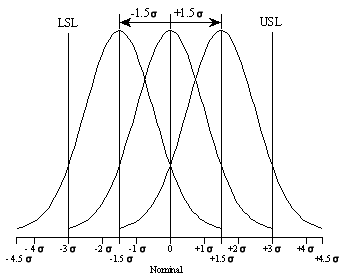
Diagram illustrating Six Sigma Process with a 0.0 Shift in the Mean.
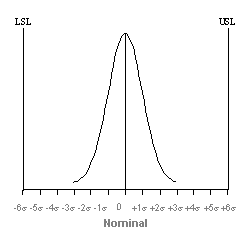
Diagram illustrating Six Sigma” Process with 1.5.
Works cited
Dealy, John, and P.Saucier. Rheology in Plastics Quality Control. N.p.: Hanser Verlag, 2000. 57-58. Print.
Fryman, Mark. Quality and process improvement. N.p.: Cengage Learning, 2002. 298-300. Print.
Ryan, Thomas P. Statistical Methods for Quality Improvement. N.p.: John Wiley & Sons, 2011. 255-257. Print
Sahay, Amar. 2010 Six Sigma Quality: statistical tools in six sigma DMAIC process with minitab applications. Web.
Verma, Srividya., and Durga R. Reliability and Safety Engineering. N.p.: Springer, 2010. 262-264. Print.