Introduction
The analysis consists of three sections, where the first part was used to experimentally verify Ohm’s law. The second and third experiments were conducted to evaluate the voltage and current divider circuits. Overall, the aim of the CEN201: Lab Experiment 1 – Electric Circuits was:
- To verify Ohms law experimentally by keeping the voltage constant and varying the resistance.
- To verify the voltage divider formula experimentally.
- To verify the current divider formula experimentally.
Theoretical Background
Ohm’s law gives the relationship between voltage and current of an ideal conductor. The relationship was first discovered by German physicist Georg Ohm in 1826 (Engineermaths, n.d; University of Kentucky, n.d). The law states that current passing through an electrical circuit is directly proportional to the voltage and inversely related to the resistance of the system, at a constant temperature (Engineermaths, n.d; Technical Books Pdf, n.d). The Ohm’s law relationship is represented by Equation 1, which illustrates that if two values of either voltage, current, or resistance, are known, the missing quantity can be determined (Technical Books Pdf, n.d). A pictorial representation of Ohm’s law is referred to as Ohm’s Law Triangle, illustrated in Figure 1. Figure 2 shows varying combinations of Ohm’s laws, indicating how different parameters can be calculated.
I = V/R (Eqn.1) where,
- I = current in Amperes (A)
- V = voltage in volts (v)
- R = resistance in Ohms (Ω)
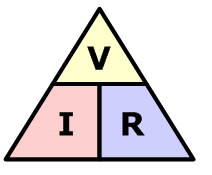
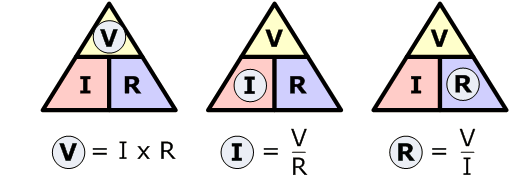
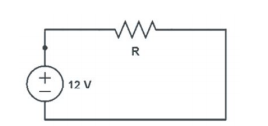
Ohm’s law is extensively employed in electronics calculations and designs. Devices that obey Ohm’s law are referred to as Ohmic, whereas the ones that do not are known as non-ohmic (University of Kentucky, n.d). Resistors and cables are examples of ohmic devices, while diodes and transistors are categorized as non-ohmic (University of Kentucky, n.d). The relationship of different factors of Ohm’s law can be determined experimentally. In this regard, the first part of the experiment was to verify Ohms law by determining the current through different resistance when the voltage was constant. A simple circuit, such as the one in Figure 3 was employed in the analysis, where a current vs. resistance graph was plotted to very Ohm’s law.
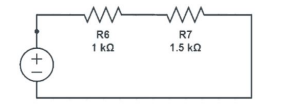
The second experiment was used to investigate the voltage divider circuit and to verify its formulas. The voltage divider formula illustrates how voltage is divided among resistors in a series arrangement. Consider the circuit in Figure 3, the current flowing through the circuit can be calculated using Equation 2. The total resistance of the circuit will be a sum of the values of resistors 1 and 2 since they are in a series configuration, as illustrated by Equation 2. The voltage across resistor 2 can be calculated using Equation 4. Substituting equations 2 and 3 into 4, the value of voltage across resistor 2 can be calculated using Expression 5, which is the voltage divider formula. The equation illustrates that the voltage across a resistor in a series is equal to the product of the ratio of its resistance to the sum value of all the resistors, multiplied by the total voltage (University of California, n.d). The same procedure can be followed to determine the voltage across resistor 1, which is given in Equation 6. The voltage divider formula was verified experimentally in this analysis.
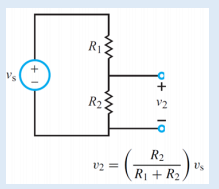
I8 = Vs/Req (Eqn. 2)
Req = R1 + R2 (Eqn. 3)
V2 = R2I8 (Eqn. 4)
V2 = R2 / R1+R2 = V8 (Eqn. 5)
V1 = R1 / R1+R2 = V8 (Eqn. 6) where,
- is = the current passing through the circuit
- vs = the voltage across through the circuit
- Req = equivalent resistance (total resistance of the system)
- R1 = resistance value of resistor 1
- R2 = resistance value of resistor 2
- v2 = the voltage across through resistor 2
- v1 = the voltage across through resistor 1
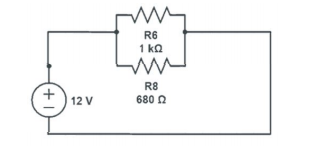
The third experiment was used to analyze the current divider circuit and to verify its formulas. The current divider formula illustrates how current is divided when passing across parallel resistors. Consider the circuit in Figure 4, the total resistance can be calculated using Equation 7. The voltage across points 1 and 2 is equal to expression 8. Applying Ohm’s laws across each resistor, the current can be determined using Equations 9 and 10 for resistors 1 and 2, respectively (Simon Fraser University, n.d). The divider formulas indicate that the current passing through a set of resistors a parallel configuration splits such that a higher amount flows through the less resistive path. If one of the resistors has zero resistance (short), all the current passes through the other one. The current divider formula was verified experimentally in the study.
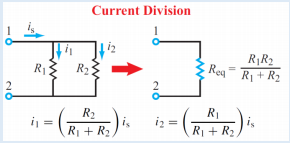
Req = R1R2 / R1 + R2 (Eqn. 7)
V12 = I8Req (Eqn. 8)
I1 = V12/R1 = Req/R1*I8 = R1 / R1 + R2*I8 (Eqn. 9)
I2 = V12 / R2 = Req / R2 * I8 = R1 / R1 + R2 * I8 (Eqn. 10) where,
- is = the current passing through the circuit
- vs = the voltage across through the circuit
- Req = equivalent resistance (total resistance of the system)
- R1 = resistance value of resistor 1
- R2 = resistance value of resistor 2
- V12 = the voltage across through points 1 and 2
- i1 = the current passing through resistor 1
- i2 = the current passing through resistor 2
Methodology
Apparatus
The experiment was conducted using an advanced electronic experiment platform, an electrical networks board, and a multimeter, which are represented by Figures 5.
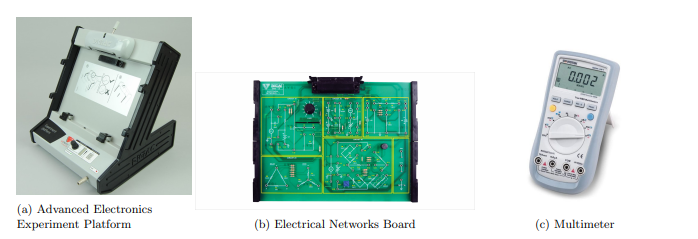
- An advanced electronic experiment platform was employed to power and provide a connection for different circuits constructed during the analysis. It also provides the output for various circuit configurations.
- An electrical network board is a circuit platform that connection of different components of a circuit, such as resistors and cables.
- Multimeter – is a handheld device for measuring the current, voltage, and resistance of a circuit or different components utilized in an electrical network.
Procedure
The analysis comprises of three parts, where the first section was used to verify Ohm’s law, while the second and third experiments investigated the voltage and current divider circuits, respectively. The first experiment began by ensuring that the Module Power Supply of the advanced electronic experiment platform was turned off. The shorting link between sockets 1.6 and 1.7 was connected. After this, the lead between 1.10 and 1.12 was also connected. A multimeter on DC mode was connected between socket 1.13 (positive) and 1.2 (common). The circuit considered for this experiment is provided in Figure 6. The value of the variable resistor was set to 100Ω Module Power Supply of the advanced electronic experiment platform was turned on. The current value was measured and recorded in Table 1. The experiment was repeated for different resistance values (200Ω, 300Ω, 400Ω, 500Ω, 600Ω, 700Ω, and 800Ω).
The second part of the analysis was employed to investigate the voltage divider circuit and to verify the formula. The experiment began by ensuring that the Module Power Supply of the advanced electronic experiment platform was turned off. After this, the shorting links between sockets 3.2 and 3.3, and also between sockets 3.8 and 3.11were connected. The voltages across resistors 6 and 7 were calculated using similar Equations to 5 and 6 and recorded in Table 2. The Module Power Supply of the advanced electronic experiment platform was switched on, and the voltages across R6 and R7 were measured and recorded in Table 2. Figure 7 illustrates the voltage divider circuit considered in the analysis.
The third experiment was utilized to investigate the divider circuit and to verify the formula. The exercise began by switching the Module Power Supply of the advanced electronic experiment platform off. The leads between sockets 3.3 and 3.6, 3.5 and 3.13, as well as the ones between 3.2 and 3.3, were connected as described in the lab manual. The current divider circuit represented in Figure 8 was utilized in the analysis. Using similar equations to 9 and 10, the current passing through R6 and R8. After this, the Module Power Supply of the advanced electronic experiment platform was switched on, and the currents through R6 and R8 using the multimeter following the connections provided in the lab manual. The calculated and measured values were recorded in Table 3.
Results
The results to verify ohms law, voltage-, and current-divider formula were recorded in Tables 1, 2, and 3 respectively.
Table 1. The results of the experiment to verify Ohms Law
Sample calculation;
Considering the first experiment involving a resistance of 100 Ω.
I = V/R
- I = current
- V = voltage = 12 v
- R = 100 Ω
I = V/R = 12/100 = 0.12 A = 120 mA
Percentage error = Theoretical value – Experimental value / Thoeretical value * 100 = 120 – 119.986 / 120 * 100 = 0.012%
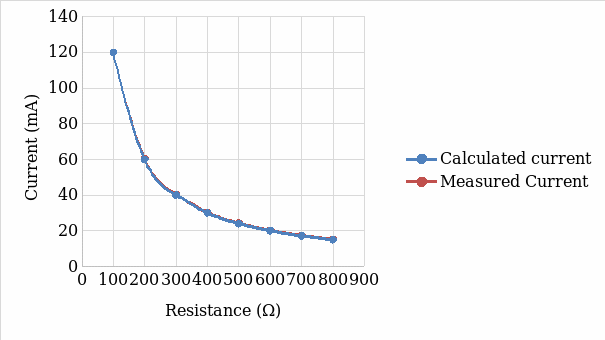
Table 2. The results were obtained from the voltage divider experiment.
Sample Calculation;
The calculated voltage across R6
V6 = R6 / R7 + R6 * V8 = 1000 / 1000 + 1500 * 12 = 4.8 volts
Percentage error = Theoretical value – Experimental value / Thoeretical value * 100 = 4.800 – 4.901 / 4.800 * 100 = 2.10%
The Calculated voltage across R7
V7 = R7 / R6 + R7 * V8 = 1500 / 1000 + 1500 * 12 = 7.2 volts
Percentage error = Theoretical value – Experimental value / Thoeretical value * 100 = 7.200 – 7.257 / 7.200 * 100 = 0.80%
Percentage error for the total voltage;
Percentage error =Theoretical value – Experimental value / Thoeretical value * 100 = 12.000 – 12.157 / 12.000 * 100 = 1.31%
Table 3. The results obtained from the current divider experiment.
Sample calculation;
Calculated current in R6
I6 = V12 / V6 = 12/100 = 12mA
Percentage error = Theoretical value – Experimental value / Thoeretical value * 100 = 12.000 – 12.367 / 12.000 * 100 = 0.031%
Calculated current in R7
I8 = V12/R8 = 12/60 = 17.65 mA
Percentage error = Theoretical value – Experimental value / Thoeretical value * 100 = 17.650 – 18.162 / 17.650 * 100 = 2.90%
Calculated total current;
Req = R1R2 / R1+R2 = 1000 * 680 / 1000 + 680 = 404.762 Ω
V12 = IsReq = 12 v = Is * 404.762 Ω
is = 12v / 404.762 Ω = 29.650 mA
Percentage error = Theoretical value – Experimental value / Thoeretical value * 100 = 29.650 – 30.503 / 29.650 * 100 = 2.88%
Discussion
In the first part of the experiment, Ohm’s law was determined by measuring the current through different resistances at a constant voltage. Both the measured and calculated values indicate that current decreases with the increasing resistance, as illustrated by Figure 9. It was found that slight variation existed between the measured and the calculated current passing through different resistances. The measured current was higher than the calculated values, which can be attributed to some resistance from the connecting cables and measuring devices, which are assumed in the theoretical consideration. The second experiment illustrates that voltage across R7 (7.257 volts) was higher compared to the value across R6 (4.901 volts). The findings indicate that voltage splits based on the value of the resistance. The higher the magnitude of a resistor, the greater the voltage across it. In the third experiment, it was found that more current was directed through R8, which has a lower resistance than R6. Hence, the current divider formula was verified experimentally.
Conclusion
The objectives of the analysis were achieved, and in the first part of the experiment, it was concluded that current passing through an electrical circuit is inversely related to the resistance of the system. The voltage divider formula was verified experimentally, and it was concluded that voltage splits proportional to the resistance value. In the third experiment, it was established that current splits such that a higher amount flows through the less resistive path for resistors in a parallel arrangement in a divider circuit.
Post-Lab Questions
- Question 1.1: The resistance is inversely proportional to the current for a constant voltage source.
- Question 1.2: Current would reduce if the voltage applied to a variable resistor is decreased by half because the two parameters are directly proportional according to the Ohms law.
- Question 2.1: A voltage across is directly proportional to the value of each resistor in the divider circuit.
- Question 3.1: In a divider circuit, more current flows in the less resistive path. Less current passes through R6 compared to R7.
References
Engineermaths, (n.d). Introduction to Ohm’s Law. Web.
Simon Fraser University. (n.d). KVL example resistor voltage divider. Web.
University of Kentucky. (n.d). Ohm’s law and resistance. Web.
Technical Books Pdf. (n.d). Ohm’s law formula. Web.
University of California. (n.d). Voltage and current dividers. Web.