Description of the Tool
Sliderocket is simply a web 2.0 application aimed at enabling users to create feature-rich presentations and share them. The tool’s purpose is to allow users to create presentations by using object effects, shapes, slide transitions, audio, video, tables, images, themes, and layouts. The tool also allows users to integrate content present in free web resources, such as Flickr, Twitter, and YouTube. This is in addition to pulling data from various sources, such as Google Docs, importing PDF and PowerPoint files, editing files, sharing files online and exporting files to PowerPoint. The Education version of Sliderocket present on the web in the form of a free Google App.
How to Use This Tool
Accessing the Sliderocket tool
To use the Sliderocket tool, a person has to sign up for an account or log in using the school’s Google account that is linked to the tool and select the ‘Sliderocket’ option from the menu bar.
Creating a presentation
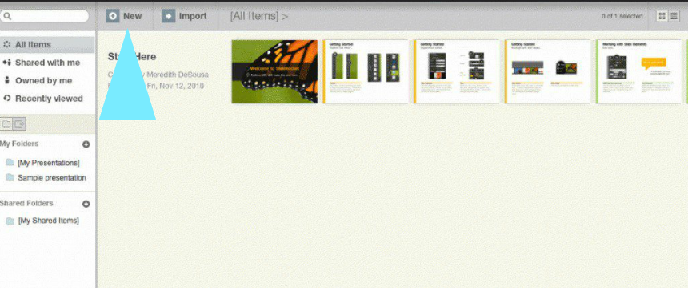
To create a new presentation, while still on the presentation library screen, click on the ‘New’ tab. As shown in the screen below, two text boxes will appear, the ‘Name’ and ‘Select a theme.’ Type the presentation’s name and choose a suitable theme for the presentation.
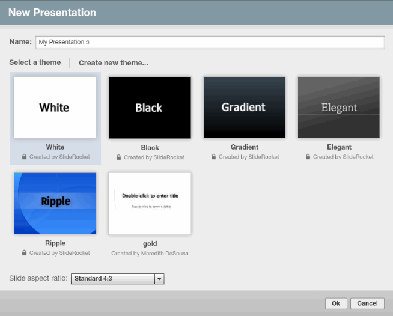
A person can only customize the themes if granted the permission to edit. Because most users lack the permission, most themes have a padlock icon to show that they are locked and cannot be edited. To edit and use such a theme, a person has to duplicate the theme. Right-clicking the theme will make the ‘Theme library’ icon to appear. Select the ‘Duplicate’ icon from the ‘Theme library’ menu to duplicate the theme. A person should duplicate a theme before creating a slide to enable him or her to select the editable theme when creating a new presentation. After choosing a suitable theme, select the ‘Slide aspect ration’ option as directed by the textbox and click on the ‘Ok’ button.
Adding features to a presentation
To change the color, size, font and more features, click on the ‘Slide properties’ box located at the right upper corner and make the necessary changes, such as adjusting the font size and color among others. Besides the ‘Slide properties’ box, the left side of the screen has several features, such as videos, pictures, text boxes, charts, reader polls, and charts, as seen in the diagram below.

To use any of these features, click on them. For instance, to add a picture, click on the ‘Picture’ icon and select the location of the picture (Marketplace, My Library, Import Media and Flickr). Double click the picture from its location to import it and click on the ‘Add Media’ icon. To replace a picture, click on the ‘Element –Specific Properties’ icon and the ‘Change Media’ ion and follow the directions therein. To flip and resize the picture use the ‘Transformation’ tab on the right side of the panel.
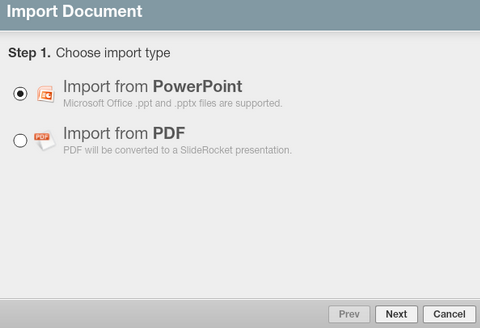
To import PDF or PowerPoint document, on the ‘Presentation Library’, go to the ‘Import’ button. Select what to import, whether PDF or PowerPoint and click on the ‘Next’ button as shown below.
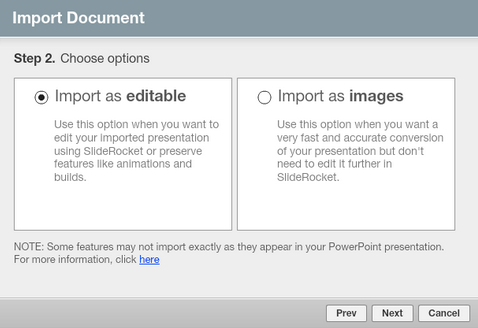
Select the import option, whether editable or as image and click on the ‘Next’ button as shown below.
Click on the ‘Choose’ button to select the file. Click on the ‘Open’ button to upload the file and then click on the ‘Finish’ button to complete the import.
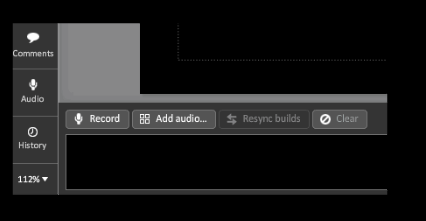
In case a person wants to include an audio, on the lower right side, select the ‘Audio’ icon. Click on the ‘Record’ button if recording a live audio or the ‘Add Audio’ button if importing an audio as seen in the image below.
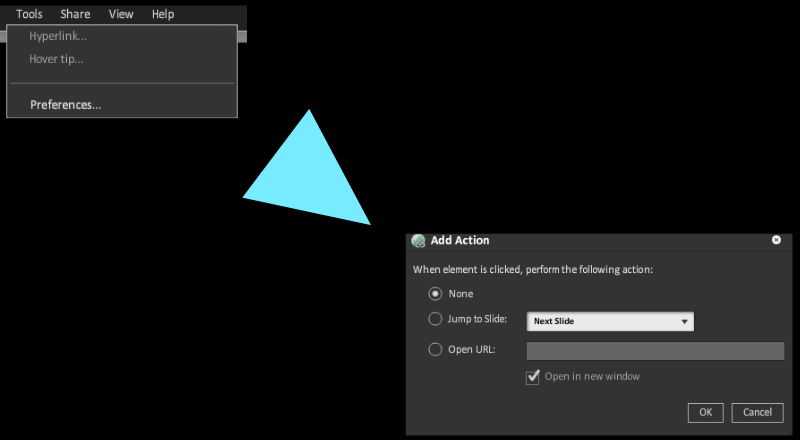
A person can also add hyperlinks by highlighting the text to link and clicking on the ‘Tools’ button. From the ‘Tools’ menu, select the ‘Hyperlink’ button. When prompted to add URL or go to a different slide, choose the URL option. In addition, choose whether the web link will open in the existing window or a different one. This is as shown below.
After completing the presentation, go to the ‘File’ icon and click on the ‘Close’ button. Click ‘Yes’ when prompted to save.
Sharing the presentation
Immediately a person clicks the ‘Yes’ button, several sharing options will appear, including ‘Publish, Collaborate, Meet and Invite’ options. To create a link that will allow everyone to view the presentation, click on ‘Publish’. To share it with a specific person, click on ‘Invite.’ This will enable a person to select the person that can access the presentation. To allow other people to edit it, click on ‘Collaborate.’ Clicking on the ‘Meet’ button will allow a person to host web meetings that will enable other people to view it. The ‘Private’ option under the ‘Publish’ option will make the presentation private. This implies that except for the user, no one else can access the presentation.
Options for modifying presentation
With the ‘Add Slide to Library’ option on the right side of the slide library, a person can create ‘a library of slides’, which can be shared with different people. After creating the library, go to the ‘Library’ button on the lower-right side of the page to access and view the library. Also, a person can allow comments on the library to stream in by activating comments. The lower left side of the page contains the ‘Speech bubble’ option. Click on it to activate the comments. The comments activated usually allow some privacy; only the creator and the commenter can access the comments.
Teachers and trainers can use the ‘Manager Users and Groups Tab’ on the ‘Account’ option to ‘Add, Delete and Import Users’, and create groups. A person can duplicate a presentation by selecting ‘Duplicate’ from the ‘Presentation Library’ button and following the directions stipulated therein. A person can also merge different presentations using the ‘Presentation Editor’ option. While on the ‘Presentation Editor’ option, click on the Library icon’. Drag the presentations to be merged to the ‘Slide Tray’. Finally, select the ‘Resolution’ option to complete the process.
How Can the Trainer/Teacher use This Tool?
- Teachers or trainers in the same area of expertise can form a group that can provide constructive criticism and recommendations for the presentations they create for students before making them available to students. This ensures that they improve on their expertise and provide quality information to students.
- Teachers and trainers can also access examples of projects that students have created and create rubrics for assessing the students using the examples.
- Teachers and trainers can also use the Sliderocket tool as a communication tool that could help ease their workload. They can communicate about projects and assignments to students at any time and receive feedback from them without necessarily having to physically attend the classroom or meet them.
How Can the Trainer/Teacher use This Tool to Support Student Learning?
As listed below, teachers and trainers can use the Sliderocket tool in various ways:
- Teachers and trainers can combine SlideRocket and screen-casting programs, such as Jing, to create the how-to-presentations. It possible to share such presentations through Sliderocket where students can access them to enhance their understanding of what they have learned in class.
- Teachers can also add media from YouTube and other sites to make learning attention-grabbing. This makes students become more interested in learning and improves the chances of understanding the topics discussed in the classroom.
- By creating student groups, teachers can use the tool to encourage collaboration and the teamwork needed in the classroom discussions to enhance the sharing of ideas and student-to-student assistance.
- Teachers can create presentations that initiate discussions or provoke students to air their opinions through Facebook or Twitter accounts. This is a constructive way of allowing students to develop their critical thinking skills. Also, this allows teachers to assess students’ progress in a given topic and formulate strategies for improvement in case insufficient progress is detected (Garland & Tadeja, 2013).
How Can Students use This Tool?
Students can use the Sliderocket tool in several ways:
- Students can use the Sliderocket tool to work simultaneously on a project from different computers. This is because the sharing and editing options allow them to detect mistakes on the project, edit them and check on the progress of the project at the same time.
- Students can also use Sliderocket mobile applications, such as iPad Sliderocket App to enable them to read the classroom presentations posted on the site anywhere using their mobile phones. This provides them with more opportunities for learning and accessing more classroom materials (eLearning and Distance Education, 2012).
- Also, students can post their projects in the form of presentations and seek constructive criticism from fellow students. This enables students to make improvements in their studies.
- Students can assess their progress by assessing their presentations against other students’ presentations. This enables them to restructure their study and learning techniques in case they notice that they are lagging.
- Students can improve on their teamwork skills at a personal level by showing commitment to Sliderocket team projects without necessarily having to meet physically with the team members.
Additional Resources
This video provides information on how to use the Sliderocket tool.
Kidd, T. T. & Chen, I. (2009). Wired for learning: An educator’s guide to Web 2.0. Charlotte: IAP.
Although this book does not specifically talk about the Sliderocket tool, it provides insight on the Sliderocket tool as a Web 2.0 application. Primarily, it provides insight on how the Sliderocket tool as a Web 2.0 Application can be used in education.
References
eLearning and Distance Education. (2012). Slide rocket, create, present & share. Web.
Garland, V. E., & Tadeja, C. (2013). Educational leadership and technology: Preparing school administrators for a digital age. London: Routledge.