Six Sigma Techniques’ Implementation Case Study

Exclusively available on IvyPanda Available only on IvyPanda
Updated: Jan 21st, 2024

Definition

The Six Sigma is a methodology that is aimed at improving the effectiveness and efficacy of a variety of business and manufacturing processes (Drohomeretski et al. 805). When it comes to manufacturing, one of the ultimate goals of utilizing the Six Sigma methodologies consists in achieving the rate of defects occurrence in the products that is lower than 3.4 defects in one million opportunities (Rahman and Talapatra 1); that is, for every ten million items produced, not more than 34 items are allowed to have a defect.

We will write a custom essay on your topic a custom Case Study on Six Sigma Techniques’ Implementation
808 writers online

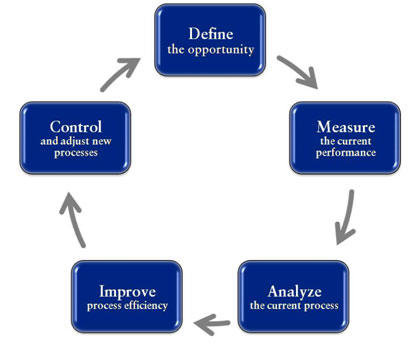
A part of the Six Sigma methodology is the DMAIC tool (Drohomeretski et al. 808), the repeated implementation of which may help an organization to more efficaciously progress towards the defect rate of 3.4 defects per million opportunities, as defined by Six Sigma. It is important to point out that DMAIC is an abbreviation that stands for the five steps which comprise the instrument itself, that is, Define, Measure, Analyze, Improve, and Control (Drohomeretski et al. 808). The definitions for these steps are provided below (Rahman and Talapatra 2).

Analyze

This is the third stage of the DMAIC instrument, at which the analysis of the causes of the defects in the production is conducted, and methods for addressing these causes are identified and prioritized in accordance with their perceived effectiveness.

Improve

This is the fourth stage of the DMAIC tool, which is aimed at testing the previously identified methods for addressing the reasons for the presence of the defects in the manufactured goods. These methods are tested using experiments and statistical tools, and then the best ones are utilized for improving the quality of goods.

Implementation in General

The implementation of the DMAIC method can be carried out in any manufacturing facility in which the rate of defects and/or the level of the effectiveness are suboptimal and, therefore, require improvements.

Analyze

After the goals of the improvement process are defined, and the factors which are to be enhanced are selected and measured so as to quantitatively identify the need for their improvement, these factors are further analyzed in order to reveal which causes result in the presence of defects in the products that are manufactured by the organization. It is possible for the improvement team to engage in brainstorming sessions so as to name the possible causes of such defects; these possible causes will then need to be confirmed as true reasons for defects or ruled out as false threats. After that, it is required to identify the possible ways for addressing the true causes of defects in the products, compare these ways, and prioritize the ones which appear to be most effective.

Improve

After the analysis of the causes of defects in the manufactured production and the selection and prioritization of methods for addressing them, it is needed to conduct a number of experiments and employ the instruments of statistical process control in order to confirm the effectiveness of the chosen methods and identify which ones of these methods work best. After the best ways for enhancing the quality of the produced goods and reducing the rate of defects in these products have been identified, it is required to implement these best methods so as to improve the quality of the manufactured production and lower the defect rates.

1 hour!
The minimum time our certified writers need to deliver a 100% original paper

Implementation of the DMAIC Tool in the Given Case Study

This section of the paper summarizes the manner in which the DMAIC instrument was employed in the casting process as described by Rahman and Talapatra (3-6).

Analyze

As has been previously stressed, this step of the DMAIC process is aimed at analyzing the problems and identifying the potential causes of the defects in the products, and finding out which methods may be used so as to address these problems. At this phase of the DMAIC tool implementation for enhancing the casting process, the data which has been previously gathered during the “Measure” step was thoroughly examined, and the improvement team visualized these results by creating a flow chart, which can be found in Figure 1 below (Rahman and Talapatra 4).

The flow chart visualizing the results of the analysis of the potential causes of surface roughness in the casting process.
Figure 1. The flow chart visualizing the results of the analysis of the potential causes of surface roughness in the casting process. Source: Rahman and Talapatra (4).

On the whole, the authors point out that two process factors, namely,

  1. the temperature at which the pouring was carried out,
  2. the size of the grains of the molding sand, had a direct impact on the magnitude of the roughness of the surface of the products (Rahman and Talapatra 4).

This caused the quality improvement team to further investigate these two factors and check the possible methods for addressing them during the next step of the DMAIC process (Rahman and Talapatra 4).

Improve

In order to enhance the quality of the manufactured products, the quality improvement team used the technique labeled the Design of Experiments (DOE), which is a statistical tool for investigating the influence of a number of factors during the “Improve” phase of the DMAIC instrument (Rahman and Talapatra 4). The authors conducted a two-way ANOVA so as to compare the mean surface roughness resulting from different combinations of two factors – temperature and grain size; four different temperatures, namely, +700°C, +725°C, +750°C, and +775°C (it should be stressed that the melting temperature of aluminum is +660°C), as well as three different sizes of the grains of the molding sand, namely, 0.03 inches, 0.015 inches, and 0.0075 inches, were used for the analysis (Rahman and Talapatra 5).

The ANOVA revealed that the grain size, as well as the temperature, both had a highly statistically significant impact on the roughness of the surface (p <.0001 in both cases) (Rahman and Talapatra 5). Running further analytical procedures allowed for identifying the grain size and the temperature which would allow for maximally decreasing the magnitude of surface roughness and reducing the number of defects related to this issue to a minimum; it was discovered that the utilization of the temperature of +700°C, as well as of the size of the grain of the molding sand equal to 0.0075 inches, permitted for the maximal improvement of the mentioned parameters (Rahman and Talapatra 5).

It is stressed that as a result of the use of the combination of these temperature and grain size, it was possible to decrease the amount of the roughness of the surface by approximately ½; the rate of defects per million opportunities was reduced dramatically: from 609,302 to 304,651 (Rahman and Talapatra 5). The authors also point out that, apart from decreasing the magnitude of surface roughness, several other defects in the products, such as gas porosity, shrinkage defects, and some others, were also lowered thanks to the utilization of the DMAIC instrument; this confirms the effectiveness of the DMAIC tool for reducing the frequency of defects in products in the process of their manufacturing (Rahman and Talapatra 5-6).

Remember! This is just a sample
You can get your custom paper by one of our expert writers

Works Cited

Drohomeretski, Everton, et al. “Lean, Six Sigma and Lean Six Sigma: An Analysis Based on Operations Strategy.” International Journal of Production Research, vol. 52, no. 3, 2014, pp. 804-824.

Rahman, Abdur, and Subrata Talapatra. “Defects Reduction in Casting Process by Applying Six Sigma Principles and DMAIC Problem Solving Methodology (A Case Study).” International Conference on Mechanical, Industrial and Materials Engineering, vol. 2015, 2015, pp. 1-6.

Print
Need an custom research paper on Six Sigma Techniques’ Implementation written from scratch by a professional specifically for you?
808 writers online
Cite This paper
Select a referencing style:

Reference

IvyPanda. (2024, January 21). Six Sigma Techniques' Implementation. https://ivypanda.com/essays/six-sigma-techniques-implementation/

Work Cited

"Six Sigma Techniques' Implementation." IvyPanda, 21 Jan. 2024, ivypanda.com/essays/six-sigma-techniques-implementation/.

References

IvyPanda. (2024) 'Six Sigma Techniques' Implementation'. 21 January.

References

IvyPanda. 2024. "Six Sigma Techniques' Implementation." January 21, 2024. https://ivypanda.com/essays/six-sigma-techniques-implementation/.

1. IvyPanda. "Six Sigma Techniques' Implementation." January 21, 2024. https://ivypanda.com/essays/six-sigma-techniques-implementation/.


Bibliography


IvyPanda. "Six Sigma Techniques' Implementation." January 21, 2024. https://ivypanda.com/essays/six-sigma-techniques-implementation/.

Powered by CiteTotal, the best citation generator
If you are the copyright owner of this paper and no longer wish to have your work published on IvyPanda. Request the removal
More related papers
Cite
Print
1 / 1