Introduction
Analog to digital converters have become very famous in all parts of the world. Designing your own analog to digital converter needs special equipment, tools and a strong circuit. There are numerous digital to analog converters and processors are available and each of which has its own advantages and disadvantages. Neutral voices follow different paths and different variations due to which human voice faces different pitches and tones.
Variations in human voice pitch and tone affect a lot in the functionality of Analogue to digital converter. There is a strong need to design a circuit by keeping an eye on the variations in input in order to produce effective and accurate output. Usually, mike is used to take input and left or right and sometimes both speakers are used to produce an output. Neutral voices and input in analog to digital converter also change due to environmental factors. Change in human voice due to any reason highly affects the output through an analog to a digital system. An efficient system always has a strong ability to absorb distortion and other noises in input for the production of effective and accurate output.
An excellent analog to the digital processor must pose the ability to produce accurate and sharp output. Generally, analog to the digital processor is used to convert the analog voltage or current in to Digital numbers. Mostly it is an electronic device but there is some non-electric or semi-electric device are also considered as analog to the digital processor. Such devices may include rotary encoders. Gray codes, binary or two’s complement are the popular coding schemes for the digital output. Resolution tells the number of discrete (digital) values a processor can produce for a range of values. Normally values are stored in binary form. It means that unit of the resolution is bit or one can say that resolution is expressed in bits. Formula for the calculation of no of bit in resolution is 2^8= 256 bits.
A good sound system can handle the peak power of an amplifier and also able to deliver it without distortion. By using headroom with an amplifier will give the sound to the satisfaction level without the distortion. Some modern amplifiers have their own headroom so there is no need of external head room. But keep in mind before buying this type of amplifiers output power of the amplifier should be equal to the IEC power of the speakers.
All the natural voices are analog in nature. An analogue to digital processor is used to convert the analog signal (human voice) into the digital signal. Analogue to digital processor works in a very simple manner. It measures the amplitude of an electrical pressure sound wave. As a result measurements in binary bytes are generated. Amplitude is always measured in a sample. Sample rate is the unit of amplitude. Higher sample rate means better quality sound. But it will increase the size of the file. A file with lower sample rate shows that it has poor sound, and small size.
Human ear can hear maximum of 20Hz.
Human audio spectrum = 20 Hz to 20,000Hz (20 KHz)
Highest audio frequency = 20,000Hz
Usually analog to digital process use some circuit to convert the analog data.
“Analog-to-digital (A/D) converters are specially designed to convert analogue input and widely used to transform analog information, like measurements of physical variables, audio signals which includes temperature, shaft rotation and force into a suitable format for digital processing, which usually involve any of following operations: processing by a computer or by logic circuits, storage until ready for further handling, display in numerical or graphical form, and transmission, including arithmetical operations, comparison, sorting, ordering, and code conversion.
If a broad-range analog signal is use for conversion, with a suitable frequency, to a suitable height of two-level bits, or digits, the digital representation of the signal can be transmitted through a noisy medium without relative degradation of the fine structure of the original signal (Asahi 2). Conversion usually composed of quantizing and encoding. Quantizing is usually refers as
“Distributing the analog signal range into a number of discrete quanta and determining to which quantum the input signal belongs”. (A/D Converter)
Encoding means assigning a unique digital code to each quantum and determining the code that corresponds to the input signal (Adrian 346). The most common used system in real world applications is binary system in form of 0 and 1, in binary systems there are 2n quanta(quanta refers to whole number, and the code is a series of n physical bi-valued bits and levels (1 or 0) interlinked with the binary number associated with the signal quantum.
The demonstration shows a traditional three-bit binary presentation of a range input signals, divided into eight quanta. For instance, any signal has the vicinity of 3/8; and on full scale it has vicinity between 5/16 and 7/16 and on both scales it will be coded as 011.
Problem Statement
Objective of this project is to design a sound mixing system that can process two sounds. One of them is analog and other one is digital. System should mix them and after mixing output is send to the speakers. First analog sound will be send to a compressor circuit. Compressor circuit can be controlled manually. Circuit is used to avoid the clipping (Distortion). At the same time analog sound is send to the digital echo adding circuit. Digital echo circuit compresses and adds distortion to the input signal. After sometime output of both the mixers and circuits is send to the main mixer, where it is combined with the digital sound. Source of the digital sound is the I-pod. Digital sound is passed through the tone control module (filter). After passing through the system it is send to the main mixer. Main mixer will be then responsible for combining the two sounds and sending them to the speakers.
Introduction and background
Analog-to digital converter include an analog modulator. Analog modulator is responsible for receiving an analog input voltage and output a pulse train. Pulse train and input voltage has equal proportional value. A digital filter is used to filter the pulse train. After filtration digital filter give the output to the calibration module. Calibration circuit is responsible for controlling the calibration module. It corrects the output and removes the errors. Pre-stored calibration parameters stored in a register are used for this purpose. A control circuit controls the calibration multiplexer. Multiplexer chooses the zero scale reference for the calculation of an offset value and stored it into the register. And select the full scale reference to calculate the scale factor.
The use of analog-to digital converters has been increased in recent years because of advancement of digital signal processing. Increase in the use of digital transmission system is also the reason of this. Usually analog to digital converter consists of a circuit. Circuit receives an analog input signal and output a digital value. This digital value is proportional to the input analog signal. Value can be any thing it can be a word or a digital bit string.
There are different types of analog to digital conversion schemes, some of them are delta-sigma modulation, charge redistribution and frequency converters. Each scheme has its own advantages and disadvantages.
Delta-sigma modulation, this type of analog to digital conversation got popularity in recent years. Analog signal voltage is input into the delta-sigma modulator in delta-sigma modulation. After inputting the analog voltage output is filter to remove the noise. In this type of conversion scheme analog input is converted into the digital pulse string. Pulse string has average amplitude over time proportional to the input. Delta-sigma conversion is popular because its gives high accuracy and wide dynamic range than the earlier delta modulation techniques. Sometime it is also called over sampled converter architecture.
Delta-sigma modulation has two main components or parts: the analog modulator and digital filter. Analog modulator produces low resolution digital output. There are number of noise sources for any analog to digital converter that can mix up with the analog modulator design. In delta-sigma modulation there are chances of noise mixing at the output stage as well as at he input stage. Digital low pass filter is used to filter the noise.
Typically digital signal processor is responsible for the digital filtering of the analog input. Digital data processor at lower rates is well handled by the digital signal processor. The process of output rate conversion is called decimation. In decimation sample rate of a signal is digitally converted to a lower rate (Kevin Nary 3). Usually the decimation process is used to remove the noise form the large amount of the frequency and outputted by a delta-sigma modulator. This process removes the almost 95% of the noise. It can be quiet expensive to implement it in a manufacturing environment. As, it may involve the adjustment of capacitor.
Brief Description
Fig 1 shows the analog to digital conversion. Calibration multiplexer receives an analog input voltage at line 10. Two other inputs can be received by calibration multiplexer 12. Terminal 14 receive full-scale Reference and terminal 16 receive zero-scale reference. Analog modulator 18 receives the out put of calibration multiplexer as input.
Analog input is converted into the pulse string by the analog modulator 18.This pulse string have an average amplitude over time proportional. Usually delta-sigma modulator realizes this. But other modulators cal also realizes or provides this type of relationship. For instance, a voltage-to-frequency converter (V/f) converter. Voltage-to-frequency converter can also convert the analog input signal into a frequency. This frequency can provide the digital output by sampling.
There are chances of noise association such as quantization noise because of the predetermined sample rate of analog modulator 18.
A digital filter is used to remove the noise and to provide a digital output. Digital output is provided on a digital bus 22.
Calibration module 24 receives the output of the digital filter 20 as input. After receiving the input calibration module 24 provides the output on an output data bus. Calibration module 24 can provide a dc offset correction in simplest mode. High linearity is exhibited by the analog modulator 18.But calibrator module 24 can be used for the nonlinearities in the output signal. Calibration control circuit 28 controls the calibration module 24 and interfaced through a bus 29. Calibration control circuit 28 stores calibration parameters in the memory register. It also controls the calibration multiplexer 12 with the help of a control bus 32.
In simplest mode calibration control circuit 28 access the calibration parameter stored in the memory register 30 and also controls the calibration multiplexer 12, so that it can provide a correction. External calibration signal CAL selects the calibration mode. And inputs to the calibration control circuit 28 from the exterior of analog to digital converter through a line 34. Analog to digital converter generate the calibration parameters automatically for storage in register 30 after receiving the signal.
Figure 2a shows the relationship between the digital output value and analog input value. Dotted curve at line 36 shows the relationship between them. Solid lien 38 represents the uncorrected value. It clearly indicates the dc offset and gain variation. That results in a different slope. Calibration control circuit 28 controls the calibration module 24 for the measurement of output value of digital filter 20. Calibration control circuit also calculates the difference between the measured value and the expected value. This is known as offset. Memory registers 30 is used to store the offset. Fig 2b shows the correction of this offset in the solid curve 40. Dotted line 38 shows the actual measured value. After making the offset correction it sis stored in the memory register 30.
After the settlement of the digital filter 20, output as the offset value is stored in the memory register. Due to this calibration module 24 and the calibration control circuit 28 can check that whether there is a difference between the expected output value on the ideal curve 36, and the actual measured value of the on the curve 40. Difference tells that there is an error. Approximation technique is used to determine gain scaling factor. Then gain factor on a scale is stored in the memory register 30. Calibration control circuit 28 controls the calibration module 24 to correct the output of the digital filter 20. Curve 42 represents the resulting offset and gain correct output. All the curves in the figs 2a-2c illustrate the uni-polar operation.
Fig 3 gives more detailed over view of analog to digital converter. As described above, in delta-sigma modulation analog modulator input an analog voltage and change or converts it in to the digital output. Seven bits digital word output on a digital bus 46 by the FIR 44 is of great significance. Decimation function is provided by the FIR 44.sample rate of analog modulator 18 is 16 kHz but it is decimated to 4 kHz rate by the FIR 44. Response filter (IIR) 48 takes seven bit input from the bus 46 and provide 28 bit output on bus 50. Major portion of filtering is provided by the IIR filter 48. The resolution of filters can be improved or increased on bus 26.
Calibration control logic circuit 52 and calibration logic circuit 28 receive 28 bit as input from the bus 50. Calibration control logic circuit 28 provides input to calibration logic circuit 52 on bus 54. Time required for analog to digital conversion is also determined by the calibrating control logic circuit 28. FIR 44 and IIR 48 both can input voltage but either on terminal 14(full scaled reference voltage) or on the terminal 16 (zero scaled reference voltage).
In Fig 3 it looks like that terminal 14 is connected to the V ref and terminal 16 is connected to the ground. 1024 operational cycles are must before the settlement of the output. 1024 cycles are must to calculate the offset. And to calculate scale factor 1024 more cycles are required. Another 1024 cycles are needed to return to normal operation. Input voltage V1n is inputted to the terminal 10. There is an important point to note, that all the operation is automatic in self-calibration mode. Self calibration sequence is initiated by the CAL signal on line 34.It calculates and store the dc offset value. It also calculates the scale factor. Three cycles are necessary to set the counter 56.
Circuit Diagram
Input mixers
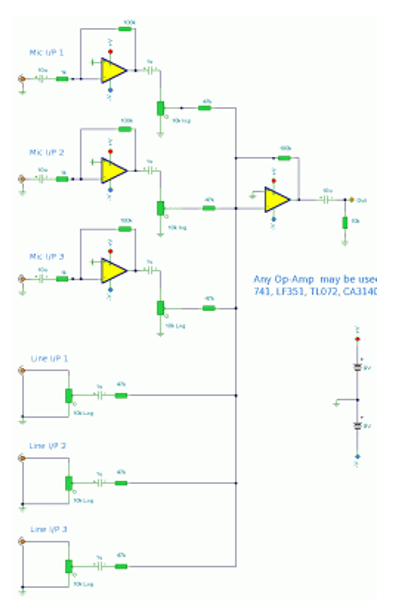
A detail of simple 3 line inputs and 3 mike inputs is given below:
It can be used with the Analog to digital processor. The following figure shows that the mixer circuit has thee inputs and three mikes inputs. 200-1000R dynamic phones can be used as with it. They are best suitable microphones with this input. ECM or condenser mike can also be used. But it’s the second option and it must have bias via series of resistors. There will be a slight loss. But it’s not a big problem because it will be with the every mixer circuit.
A gain of 2 or 6db can be summed to the final amplifier handle this problem. Keep in mind that the input level should must be the approximately 200 m V RMS. The mike inputs are amplified to the 40 db. In this way total gain with the mixer can be 46db. The mike inputs are designed in such a way that microphones give 2mV RMS at a combine or a single meter. Majority of the microphones meets this standard.
Op-amp is not the only solution for this type if circuit. MOS type op-amps or bipolar, FET can be a good substitute. Two batteries of 9 volts can be used but if want to use for longer periods then power supply is recommended. The power supply should be dual negative and positive supply. As shown in the above diagram.
Another input mixer can be also be used. This is discussed below.
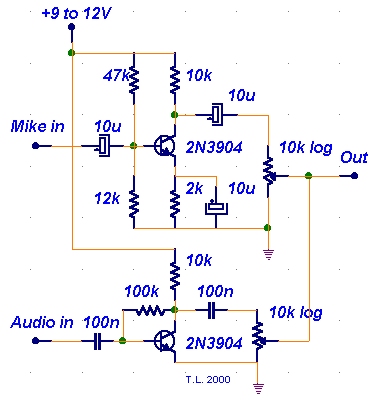
It’s a simple input mixer. It contains two transistor based preamplifiers.
One can be used for the higher gain. As shown in the diagram as “Mike in”. Norma regular microphone works best with it. The other “audio in 100n” can be used to control the input form any other source like CD player or tape player. Keep in minds that don’t place the circuit to much close to the main transformer. Modification can be made to it to control it better. But it can also be controlled manually, with out any modification.
In fig 4, The FIR filter 44, is highly depend on FIR digital signal processing which is linked with an attached FIR controller 60 for effective results through bus 60. The whole circuit is interconnected in order to process analog input to digital sound. The constants of filter 44 are linked with the coefficient of ROM 64. The constants of filter 44 are in the FIR constants Rom 64 which is interlined with a FIR controller 60 through a data bus 66. It is always preferable in order to create an efficient and time saving system to use buses and FIR controllers so that voice can be changed within a seconds. As much the system is strong the output would be strong and effective. Use of unnecessary buses and controllers usually make system messy and inefficient. In best incarnation the ROM 64 is linked with a prologic array.
Superb calculations are required in order to produce effective and strong mixing system. For the various types of inputs it’s necessary to use strong and efficient buses and logic array in order to make sound system effective. Logic array has of great significance and provide a suitable pathway for setting up a strong circuit. The FIR DSP is significantly important and an essential part in designing digital to analog processor.
THE FIR DSP is an Arithmetic logic unit which takes input for multiplexing in order to perform the calculations important to realize the functionality of the system. Basically, digital filters are composed of series of arithmetic functions i.e. multiplication, addition and subtraction steps which are necessary to execute in a sequenced order. The serial data stream from moderator 18 is executed through FIR DSP 58 for the storage of coefficients in the ROM 64.
This series provides an output on bus 46; bus 46 is comprised of seven bits which are used to save data for further processing. Storage on bus 46 at a rate of 4KHZ as compared to 16KHZ output by the modulator 18. The FIR DSP 58 provides dissemination of the output modular 18 on 16 KHZ rate to a 4KHZ rate. The IIR filter and circuit 52 are made with the aid of IIR/CAL digital signal processor (DSP) 68.
The IIR/CAL 68 is exclusively designed in order to control the operation of DSP 86. The designed DSP 68 is linked with the controller 70 with the aid of two dimensional data. The control bus 72 and the controller 72 is linked with an IIR coefficient ROM 74 with the aid of bus 76 and with the combination of bus RAM through two dimensional data bus 80. The IIR CAL DSP 86 has of great significance in overall circuit. It is specially designed keeping an eye on change inputs.
The IIR/CAL DSP 86 is a strong arithmetic logic unit which owns input for multiplexing to provide a sequence of multiplication and other arithmetic operations according to IIR algorithm. Once the IIR function is complete, results are used for producing different outputs. Once the filter unction of IIR the results are usually used in order to perform the calibration and correction function with the aid of same arithmetic and logical unit. The single arithmetic unit provides the filter function the calibration function and the output correction function. While processing, some units and data are stored in ROM 64 for further processing.
According to IIR algorithm it is an important factor to store coefficient in Rom 64 and utilized them in later stages. The output of the IIR /Cal 68 is an input of parallel to serial converter 80 that which is use to convert 28 bit output in to 16 bit serial data string. As it is states above that calibration and output correction function are operated at twenty eight bit resolution and as it has been observed that output is on 16 bit resolution.
A flow chart shows the calculation for self calibration operation. According to which calibration starts at block 90 and travels to decision block 92. If “Y’ is not present then input travel back to the input of decision block 92 through “N” path. When Cal signal is present, usually a zero scale value is selected in a function block 94. After selection of zero scale value, the program offers a delay of 1024 cycles, and then the program flows to the function block 98 to calculate and store the offset value.
In following Fig a flow chart for the output correction process is shown after the storage of the parameters in the calibration RAM 78. The input usually start at block 116 and flows back to block 118 in order to fetch the offset value from the calibration of RAM 78. If system is bipolar then the input usually flows along the “Y” path from the 121 de4cision block. In the bi-polar mode the sequence of input and output is slight differ from polar mode. Sequence of input has of great importance in overall circuit. A strong circuit helps in producing effective and strong results. Both bi polar and polar mode processing is different in sound mixing system.
The analog to digital converter needs strong interfacing and an efficient bus sequences so that the voice can travel in the right direction and chooses straight path. The analog to digital processor of claim one receives input comprises of a multiplexer i.e. having one input and multiple outputs. A self calibrating analog to digital converter is usually comprised of a modulator for receiving analog input and outputting a digital signal proportional to said analog input signal.
Audio input mixer is easy to design it usually needs two transistor based preamplifiers. The one is of higher gain and second one is usually low. Sound input mixer usually works with a regular dynamic microphone. The second transistor is sued to control audio input from different sources like tape or recorder or CD player etc. Audio mixing needs special attention in order to produce effective and efficient results.
Audio mixing is a procedure by which a multitude recorded sounds are usually combined into one or more channels. Multi-track recording can also do by the aid of following system. Generally, different types of equipments are used in mixing system. Basically there are three process involved in sound mixing1) Mixing 2) Routing 3) processing. All three sub processes are important and play pivotal role qt mixing console. Following equipments are generally used in audio mixing: Mixers Outboard gear and plug-in, Processors, Faders, Compressors and Equalizers. Live audio mixing is also another aspect of audio mixing.
Live audio is a process in which a multitude of sound sources are combined through one or more channels in a live performance. The whole process of live mixing is done via sound engineering or recording engineering. The best example of live audio mixing is a live concert in which two mixers are involved one is fixed in the audience to mix front of house speakers and other is usually located at the side of the stage. Mixing of speakers is directly positioned in front of the performers in order to make sure that they can hear one another. A separate mixer of broadcast can also be fixed.
Tone Control Module
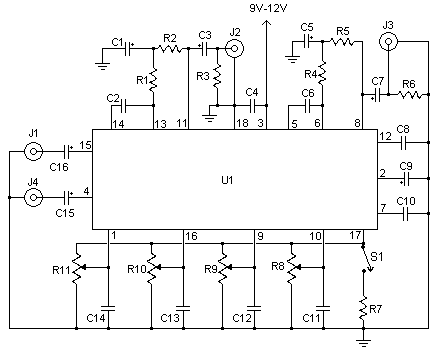
A simple but powerful tone module control is shown above. It is useful for many applications. It’s up to the owner that he uses this as a stand alone module controller or adds it to the amplifiers. Also it can be used with any analog to digital processor. One interesting feature is that it can also be used to build new and exciting instruments. One IC shows that dual power supply is not must for it. 9 to 15 volts are enough to use this. But remember that bass will be weak in case of 9 volts usage.
Table shows that hardware information.
R10 is used to control the balance. R9 is used to control the bass.R8 is used to control the treble.
J3 and J4 are the right outputs while J1 and J2 are the left inputs. A voltage divider is must for a stronger signal.
Here is another tone control modular discussed below.
A high quality performance, Portable mixer that uses 9 volt battery can be designed easily. Three main modules can be assembled to it according to the needs.
- Input Amplifier Module
- Tone control Module
- Main mixer Amplifier Module.
Tone control module will only be discussed here.
Tone Control Module
It’s a three band Control circuit. Three bands will be (bass, treble and middle). Unity gain is provided in response of the flat frequency. It can be inserted after the main amplifiers but also can be used independent with any analog to digital processor.
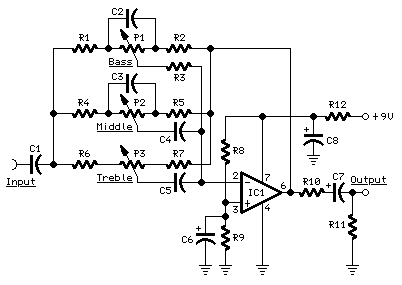
It is a simple circuit designed to control the three bands. When the control module in the center then the voltage gain will be 1.
Parts
- P1, P2_________100K Linear Potentiometers
- P3____________470K Linear Potentiometer
- R1, R2, R3_______12K 1/4W Resistors
- R4, R5___________3K9 1/4W Resistors
- R6, R7___________1K8 1/4W Resistors
- R8, R9__________22K 1/4W Resistors
- R10___________560R 1/4W Resistor
- R11___________100K 1/4W Resistor
- R12___________220R 1/4W Resistor
- C1______________1µF 63V Polyester Capacitor
- C2_____________47nF 63V Polyester Capacitor
- C3, C5___________4n7 63V Polyester Capacitors
- C4_____________22nF 63V Polyester Capacitor
- C6, C8_________100µF 25V Electrolytic Capacitors
- C7______________4µ7 63V Electrolytic Capacitor
- IC1___________TL061 Low current BIFET Op-Amp
Note
- Frequency response = 20 Hz- 20Khz
- Tone control frequency = ±15dB @ 30Hz; ±19dB @ 1KHz; ±16dB @ 10KHz
- Distortion at 2 v RMS = <0.012% @ 1 KHz; <0.03% @ 10 KHz.
- Maximum Distorted output = 2.5V RMS.
Microphone Preamplifier
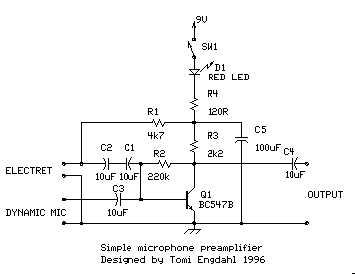
It’s a simple microphone pre amplifier. It doesn’t use any special protection circuit. It’s one transistor circuit. Its frequency response is 20 Hz to 20 KHz tat makes is little bit noisy. It uses the commonly available components. A line level input or microphone or computer sound card can be used. Less than 10mA current is required for it. It will cost you a total of $ 10. So it’s not a huge amount. It’s cheaper than any market pre microphone amplifier.
It can be used between the amplifiers or analog to digital processor and microphone. It can take both the dynamic and electric microphone. It is kept simple so that every can make it easily. This circuit is simple it uses one transistor amplifier and amplifies about 30-40 db. LED D1 shows that circuit is operate able. Drop in voltage is caused by the LED (around 1.8V for RED led). Resistor R4 and capacitor C5 are used to filter the noise. It tries its best to reduce the noise to maximum possible level. DC bias is blocked by the capacitor C1, C2 and c3. Because it’s a very simple and a cheap circuit. So the distortion performance is not so good. There will be distortion of 2-3%.
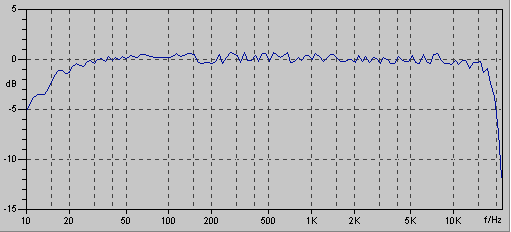
Attenuation is another problem. Attenuation is caused by the sound blaster. Microphone preamplifier circuit generates bass frequency. List of components is given below.
R1 4.7 kohm
R2 220 kohm
R3 2.2 kohm
R4 120 ohm
C1..C4 10 uF 16V electrolytic
C5 100 uF 16V electrolytic
D1 Red LED
Q1 BC547B
SW1 on/off switch
May be some components are not available in the market easily. Then other suggested components can be used. For example if BC547 is not available then, 2N222. It also works well. Value of R2 can be changed between the 100 kohm and 470 kohm.
R1, c1, and C2 can also be left. One can leave them to make it more simple circuit.
Versatile Compressor
It will be versatile compressor circuit that take the analog data as input and compress it to avoid the clipping. It protects the analog data from distortion. This circuit is controlled manually. One can set the compression according to its needs. At the same time there is another circuit that is responsible for the echo.
Digital Echo
IC 1 is worked as clock generator, which runs at the speed 4 tie greater than the sampling frequency. Frequency can be adjusted by the VR1. This unusual configuration generates output with equal mark space ratio. IC7 (A-D) converter need a negative bias on pin 5. As the voltage Requirement is very low. Sop this negative voltage can be obtained by rectifying the clock signal from IC1; it gives approximately -4 voltages.
There is another IC named IC2. It produces the four pulses. Three of them are inverted by the gate in IC3. A-D processor IC7 starts a conversion when Q1 goes high. After the data in Q2 is high, all the data of RAM sent to the D-A converter IC8. It produces the required voltage. Data is stored in the Ram when Q3 is high (Mark 1). Address counters IC4 and IC5 got increment because of the Q4. Whenever Q4 goes high it causes increment in the address counters IC4 and IC5.
Amount of the Ram chip to be used is set by the SW2. Sw2 detect the address counters before they are reset. If there is continuously variable delay pot on the 555 clock circuit it’s the ideal condition. But it’s not possible to achieve the required range. Analog data is input in the versatile compressor circuit that compresses it.
At the same time data is sent in the echo circuit that adds the digital echo.
After if the analog data is send to the main mixer where it is mixed with the digital data and after mixing sends it to the speakers.
Threshold
Analog processor is used to adjust or manage the threshold. Automatic gain control topology is used for the compression. Threshold adjustment permits the operator to select that level at which compression starts.
Baxandall control
Simple resonant network is usually used for the active lc design. Band pass filter function is created by the LCR resonant circuit. Fro this purpose a famous topology is used that is based on the Peter Baxandall’s famous negative feedback tone control as shown in the diagram below
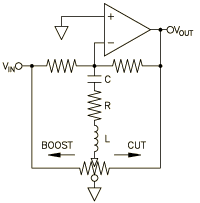
LC equalizer based on Baxandall negative feedback tone control circuit
Buffer
Buffer may be used as a device for short radio signals in the internal control unit.
Dynamic range
Problem of dynamic range is solved by using the multi-band compression schemes.
Minimum voltage range used in quantization process is determined by the bit resolution. And
Can be represented digitally.
Ratio
Compression ratio is also managed by the analog processor. Ratio of compression can be described as the ratio of total gain reduction of the input signal to output signal. Input output level is used to measure the amount of the ratio numerically.
Attack
Attack time is adjustable, it allows the users to adjust the short term loudness according to their requirement or need.
Digital delay echo
AD converter is used to convert the input signal into the digital signals. After it supplied to a feed back loop that have a digital delay circuit. In this ways echo is produced. There is no special or separate device for this purpose.
Amplifier mixers what they do speakers
Amplifier takes the weak input signal as input mixes it and boosts it. So that it can have enough power to drive a speaker.
Performance Equipment
There are meters that show the performance of the system. There are numerous equipment involve din overall circuit. The overall system needs strong and effective interface in order to process analog sound (human sound) into digital sound. As it has been observed in the overall system, numerous equipments are linked together. Buses, RAM, ROM and controllers play pivotal role in overall system. Performance is highly based on their setup. Overall, system setup is exclusively designed keeping an eye on various factors like variation in sound input. There are a number of variations involved in analogue input.
Pitch and tone highly affects on the output. Variations in pitch and sound input have a great impact on output. This is the only reason why analogue sound is difficult to deal with. Tone and variations in pitch usually causes problems while passing through circuit. Buses and controllers required a smooth flow in order to produce effective output from a speaker. Overall, performance of equipments is highly based on complete setup of the circuit. When processing sound homogenous mixing of components is extremely important. There are certain conditions on which system works extremely fine and in some cases equipments and overall circuit doesn’t work smoothly. There are some limitations like, smooth flow of input, clear and up to the mark input, buses and controlled should be interfaced accurately.
Testing procedure
Testing procedure based on the Histogram method. It uses triangular waves of small amplitude. It has several advantages as compared to the traditional static test.
A dynamic test can be performed by the use of Gaussian noise this can determine the nonlinearities and compensating.
Analog to digital processor can be best tested by combining a histogram-based approach and spectral analysis. It completely checks the analog to digital processor. Testing procedure normally checks for the distortion.
Expected problems
A problem can arise because of its nonlinear nature and feedback, because of limit cycle oscillation. It will produce a non desirable tone. This tone is not bearable in this type of application. There are many other problems can be found in analog to digital processor, some of them are given below.
Aperture Delay
DC Common-Mode Error: – It is expressed in the LSBs. It occurs due to the change in the analog input voltages. It also affects the output.
Differential Gain Error:- It shows the difference between the output amplitude in percentage.
Differential Phase Error:- Difference in the output phase of small signal sine wave is called differential phase error.
Full Scale Error:- It is measured by the Vmax+1.5LSB-Vref.
Gain Error:- To determine the gain error its formula is Vref-1.5LSB
Missing Codes
Offset Error:- It’s the difference between the actual transition and ideal LSB transition.
Output Delay: – time delay
Pipeline Delay
Tolerance Analysis
Tolerance analysis is the key part of all systems. It indicates and helps in determining the strength of a system. It also helps in evaluation of the system. The following system gives complete control on devices. All devices can be handled manually. All setup is completing reprogrammable, it is a stand alone system, and it’s a complete portable unit. It has strong control on overall flow. Microprocessor and A/D converter has fault tolerance capacity and have ability to handle strong and low pitch control.
Testing phases gives complete evaluation of the project. IT is always recommended to make test cases in order to judge the fault tolerance and functionality of the overall system. A key part of the entire system is to compare the incoming data stream with the stored data stream. A tolerance must be allowed in order to match words. But the care should be taken that word sound similar will also work on the particular system. Fault tolerance of the following system gives a complete idea of system evaluation. The research done with the use of different techniques will conclude how much tolerance is allowed in the particular system.
Cost Schedule
Cost Analysis
Labor: $60/hour * 2.5 * 15 hours/week * 10 weeks = $22500
Parts
Hardware $350
Receiver Modules (2) $10 each
Module/Light Link (2) $10 each
Total Parts $390
Total Cost: Labor + Parts = $22890
Schedule
- Week 1: Continue research on various analog to digital processor devices,
- Week 2: Learn signal processing tools, learn assembly Language, and become familiar with sound theory
- Week 2: Research for Digital Logic and Design, continue Learning assembly language, programming, other circuit designing Design review
- Week 2: Research and test methods for processing continuous audio signals
- Week 3: Designing
- Week 4: Spring Break
- Week 4: Designing
- Week 5: Implementation
- Week 6: Testing
- Week 7: Write final paper and prepare demo and presentation
- Week 8: Demo and presentation
- Week 9: Final papers and Documentation.
Works Cited
Asahi Kenai, “New digital Sound Processor”, Europe, SAS, (2008).
Adrian H, “Digitally calibrated Delta sigma converter”, 341-367, (1988).
Kevin Nary, 2009, Design Of A High-Performance Analog-To-Digital Converter. Web.
Mark Heur, 2009, Voice Activated Control System (VACS). Web.