Introduction
The creation of the autonomous mobile robot (AMB) project is the most important branch of the unit, HES 1305 ROBOTICS AND MECHATRONICS PROJECT 2. The plan, design, building, programming, testing, as well as debugging the different components of the project, would involve teams which consist of three members.
The purpose of the autonomous mobile robot would be to travel through a maze while avoiding going over the wall of the maze. In addition, the AMB would also be required to look for certain types of “pucks or meteorites” that would be identified by their colours, in a mission, which is simulated, in Antarctica.
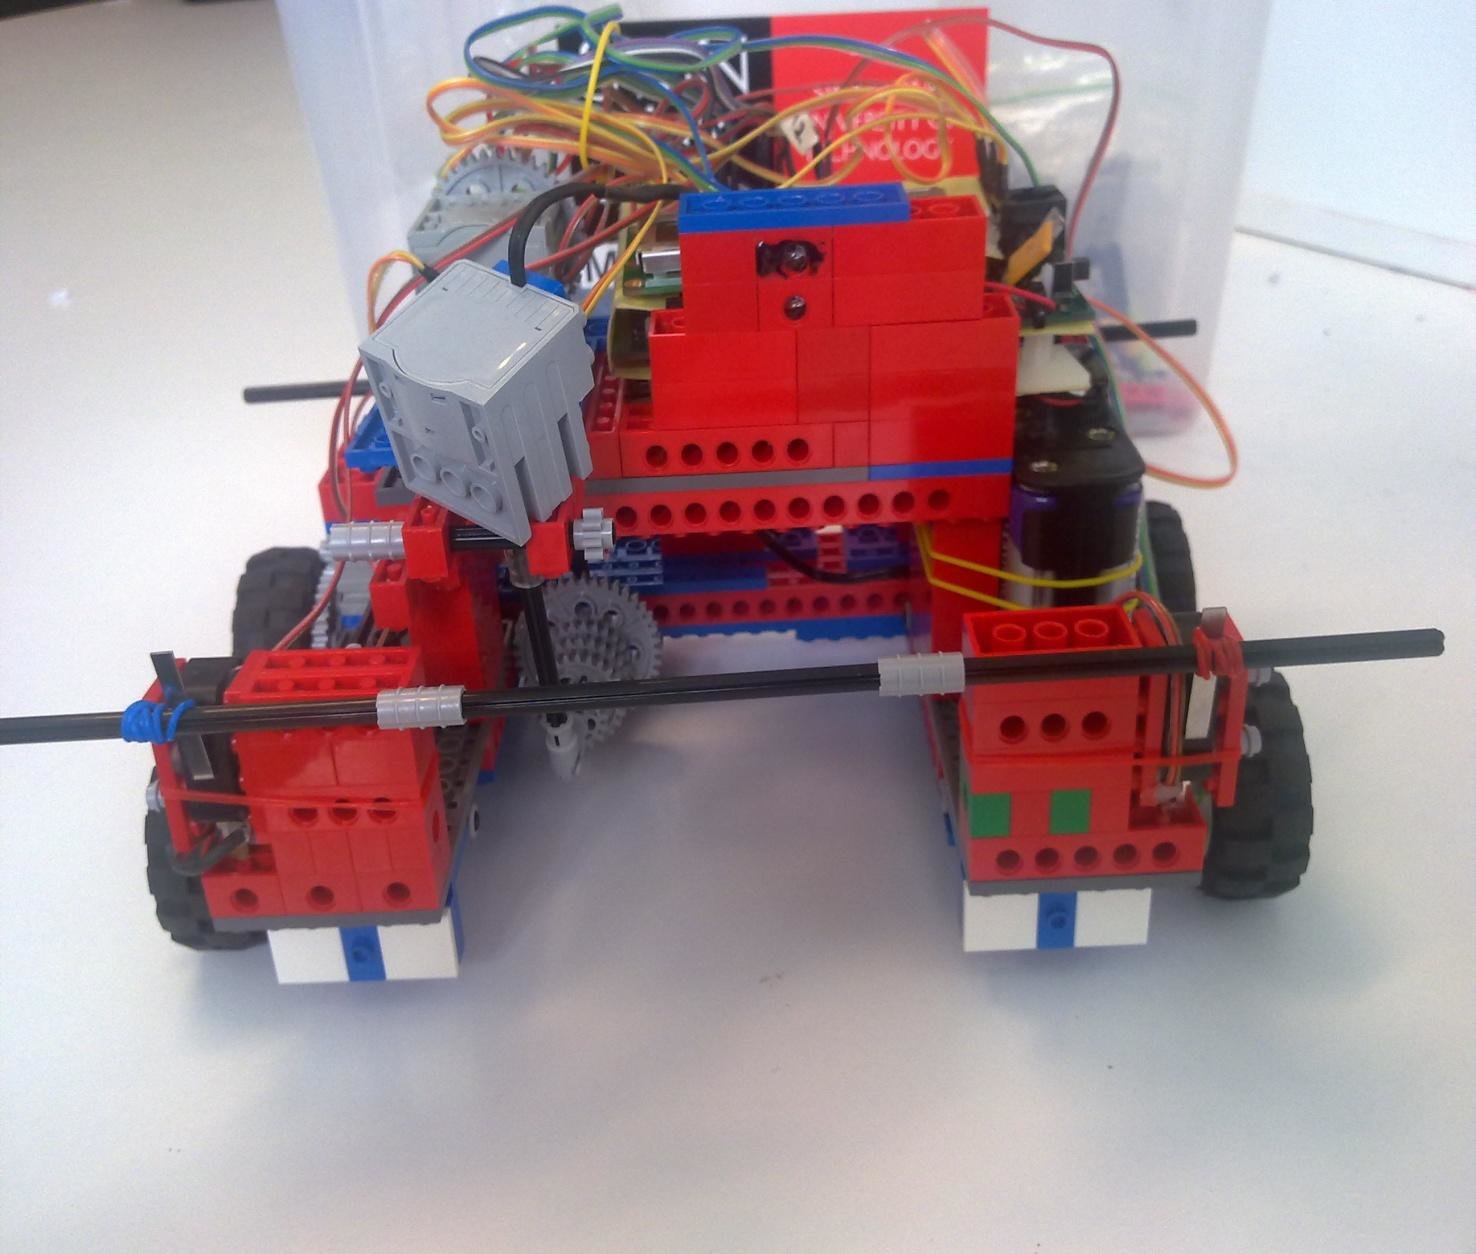
As a result of the intricacies of the predicted settings, the AMB would be required to carry and place the meteorites or pucks in their respective base camps; they should not be thrown or rolled on the ground. In addition, the robots would not be allowed to get rid of unwanted pucks from the camps, or destroy other robots.
The project is in fact a competition pitting different teams against one another. Each team would provide one robot in the competition area to collect as many meteorites and place them in the specified camps. The teachers and staff of Swinburne University provided all the sensors, LEGO parts, software, and actuators.
The Method Of Design
Design Philosophy
One vital building block of artificial intelligence involves creation of a robot that has the ability to function under diverse and indeterminate environments, while under partial supervision.
The Development of the Design
Being the first time that we are taking part in this type of competition, we decide to work out a plan that would help us develop the autonomous mobile robot in the given surroundings.
The most important part of the design involved coming up with a solution that would help the robot grab and flip over the meteorite or puck. After that, we had to go backwards with the intention of building a structure that could support all the equipment, actuators, and sensors, in order to produce a practical robot in the contest atmosphere.
Design Process
Hardware Part – (Name of Team member who handled this part)
Handy board
Autonomous robot control is usually attained by means of a Handy Board [Martin 2001]. The Handy Board was found to be a battery-powered and hand-held microcontroller board. It was perfect for both educational and personal robotics projects. It was based on the structure and functions of the Motorola 68HC11 microprocessor.
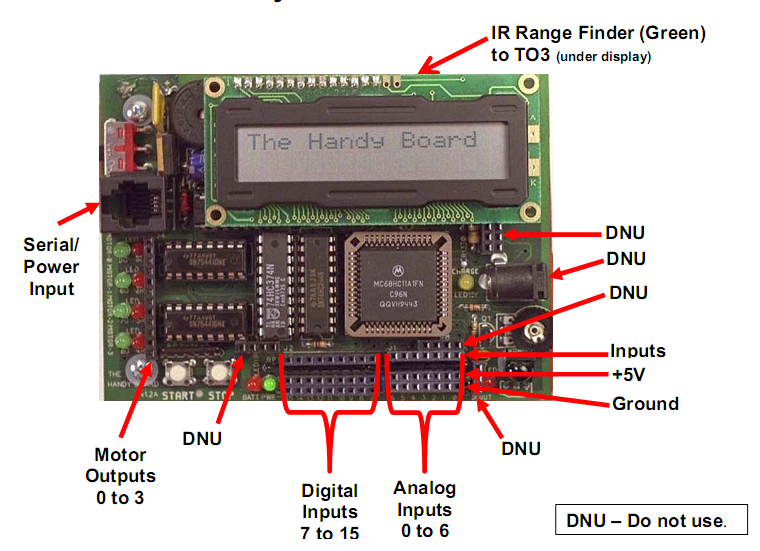
Figure I
The Handy Board contained the following parts:
- Processor: Motorola 68HC11 8-bit microcontroller with 2MHz speed
- RAM: 32KB battery-backed fixed RAM
- Screen: 16×2 character LCD display unit
- Four 1A motors support
- 6 Servo motor controllers
- 9 Analog and 7 Digital inputs
- 16 Analog and 8 Digital outputs
- Infrared I/O capabilities
- Serial interface capacities
- Sound output
- 11cm x 8.5cm x 5.25 cm (L x W x H – with LCD screen, expansion board, and battery)
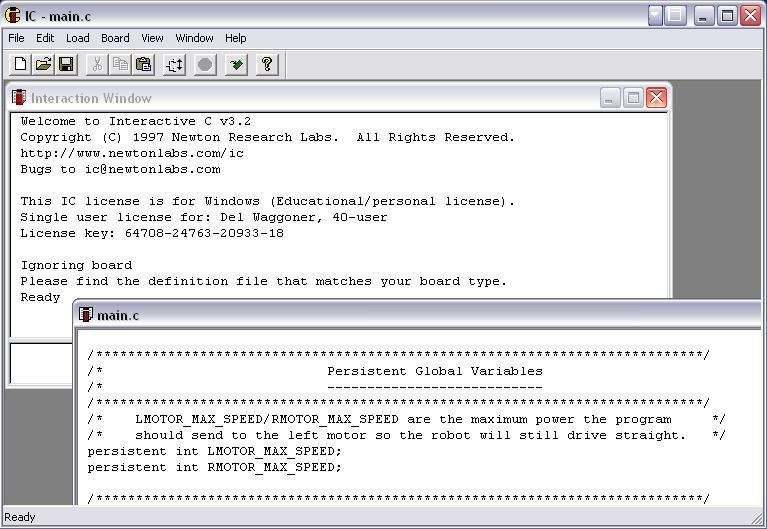
Figure II
The Handy Board manages Interactive C (IC). The Interactive C is a custom-made version of ANSI C programming language. Interactive C is the most widely held compiler software that is made use of with the Handy Board.
In addition, the Interactive C software is a multi-tasking compiler; it has a user command line that is used for dynamic expression evaluation and compilation (Martin, 2001). The IC is sustained by the Kiss Institute for Practical Robotics (KIPR). The figure above (figure II), demonstrates the running of the IC compiler on Windows XP.
Procedure followed for programming the Handy Board using Interactive C
Step 1: The Handy Board was connected to the computer using either the Serial Interface or the USB.
Step 2: The wall adapter was then used to supply power to the Handy Board.
Step 3: Afterwards, the Interactive C compiler software was launched on the computer.
Step 4: The board was then initialized with firmware. This was achieved by holding Handy board in a unique bootstrap download mode and then clicking on the download firmware found on the tools menu of the IC compiler software.
Step 5: After completion of downloading the firmware, the Handy Board beeped, and the Interactive C welcome message appeared on the LCD screen of the Handy Board. This means that the Interactive C is now ready for use.
After finishing configuring the system, we are now ready to write the necessary programs using Interactive C IDE software. Then later, we would compile it, and after that download it on to the Handy Board that will run that program.
Sensors
Each LEGO kit was supplied with the following sensors:
Table I
Out of all these sensors, our interest and use will be limited to Combined Lego Motor & Gearbox, Micro switch, Shaft Encoder, Phototransistor, LEDs, as well as IR Emitter/Detector.
LED is the short form of a light-emitting diode. Just like the name suggests, an LED is basically a diode that gives off light.
The difference between LEDs and other incandescent bulbs:
LEDs are different from ordinary incandescent bulbs in the sense that they are short of a filament, which burns out. As a result, they do not get especially hot. They are solely lighted up by the motion of electrons in a semiconducting material. In addition, they could last as long as a typical transistor.
Advantages:
The use of LEDs endows the user with a number of advantages in comparison to the use of regular incandescent sources of light. Some of these advantages include enhanced robustness, lower consumption of energy, longer lifetime, greater durability, smaller size, improved reliability and faster switching (Jones, Flynn & Seiger. 1999; Papert & Harel, 1991).
How LEDs work?
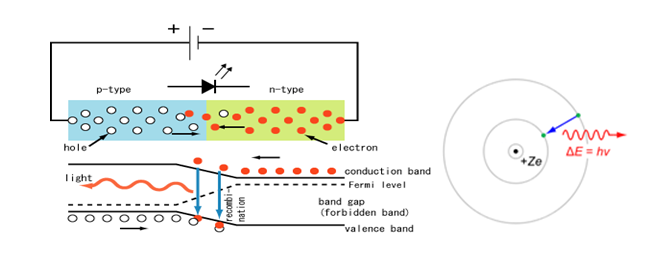
Figure III
When an LED is switched on, i.e. forward biased, electrons in the PN Junction are capable of recombining with the holes found within the device. As a result, energy is released in the form of photons.
Consequently, the energy gap of the semiconductor has some bearing on the colour of the light, or the wavelength of the radiation. This is to mean that doping has some bearing on the wavelength of the Electromagnetic radiation which will be given off.
In general, light-emitting diodes are usually made from substrates of Aluminium-gallium-arsenide (AlGaAs). From Electromagnetic spectrum, the wavelength for red is normally between 620 and 750 nm, while that for blue is between 450 and 475 nm. In other words, Red LED and Blue LED means that their doping components are such that the emitted wavelengths range between 620 and 750 nm, and between 450 and 475 nm in that order.

Figure IV
LEDs have two major uses; visual indicators and light emitters. As visual indicators, they detect the presence of things. When used as light emitters, they are usually detected by other detectors, such as phototransistors and photodiodes. Interestingly, they can be used as narrow band light sensors. Here, they operate in the reverse-bias mode. They act in response to incident light as opposed to emitting light.
Phototransistor:
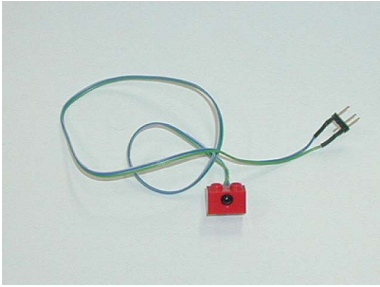
Figure V
A phototransistor can be described as a transistor that operates differently from common transistors. Unlike common transistors, whose operation modes are under the control of the applied input voltage, the operation mode of the phototransistor is can be directed by light, or the wavelength of the light.
The structure of a phototransistor varies from that of a common transistor, at least in two distinct ways;
- While the phototransistor has a transparent window that allows light to shine on the junctions, ordinary transistors do not have such windows.
- An ordinary transistor has more surface area than a phototransistor, hence is able to maximize the area of light capture.
When the junction is struck by light photons, there is formation of a base current. As a result, the received power is converted into a collector current by the phototransistor.
The phototransistor that comes with the LEGO kit has its peak response at 850 nm and its spectral sensitivity is higher than 30 per cent for light radiation that ranges between 6oo nm and 900 nm.
The achievement of different gain and frequency of operation (bandwidth) is dependent on the amplifiers, or circuits, formed with these phototransistors. The positive thing that is exhibited is that the frequency and gain response is reliant on the light and its wavelength.
Infra Red (IR) Emitter/Detector:
The infrared emitter or detector is a circuit that is created using LEDs and phototransistors (Martin, 1994). The purpose of the IR emitter/detector is either to give off or to detect infrared radiation. An extremely fundamental infra red emitter/detector circuit is shown and described below.
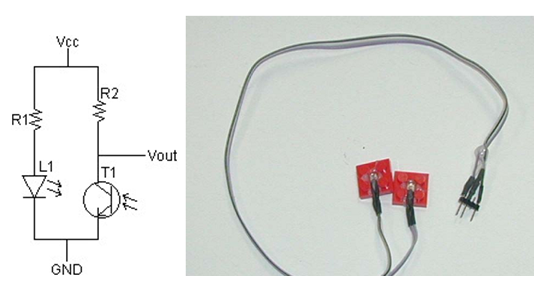
Figure VI
This custom made circuit has one disadvantage; the use of this custom made circuit means that the ambient infra red light would constrain its detecting devices (Martin, 1994).
The IR emitter/Detector that came with the LEGO kit had its peak response at 940 nm, with peak sensitivity for about 880 nm wavelengths. The IR Emitter/Detector has found many uses in robotics; it can be used for colour detection, transmitters, motion detection, obstacle detection, and encoders.
Shaft Encoder:
Shaft encoders can also be referred to as rotary encoders. In essence, it is an electro-mechanical piece of equipment that translates the total amount of mechanical rotation, or angle, into a corresponding amount of current (Sutton & Barto, 1998).
As a result, knowledge in relation to the amount of current offers information regarding the amount of rotation of the shaft, or the wheel connected to the shaft.
In general, there exists, two kinds of shaft or rotary encoders;
- Absolute shaft encoders
- These types of encoders are the ones that provide us with information regarding the complete angle of rotation of the shaft.
- The digital type of absolute shaft encoders generates distinctive digital code for each different angle of the shaft.
- There exist two fundamental kinds of absolute digital rotary encoders. These are optical encoders and mechanical encoders.
- Incremental shaft encoders
- These types of rotary encoders are the ones that provide us with information regarding the angles or rotations with regard to their previous states.
The angles of rotation that are provided by the shaft encoders are in coded form. The two available and most popular methods used for encoding are Gray encoding and standard binary encoding.
It is worth noting that for all advanced jobs, which involve the rotation of the wheel, there must be a feedback mechanism that comes from the wheels.
As a result, it is vital that the control program is aware of the extent to which the wheel would rotate to with the intention of either altering the speed of rotation of the different wheels, or simply making sure that the vehicle is motionless and no unknown force is acting on it. This is basically the reason why shaft encoders are employed.
Micro switch:
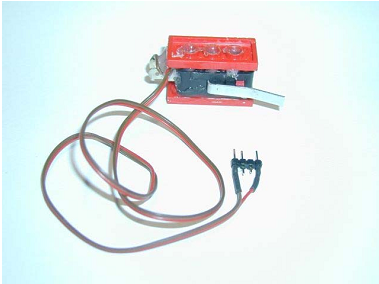
Figure VII
A micro switch can also be referred to by its technical name, miniature snap-action switch. As implied by its name, the micro switch is a switch that calls for a comparatively miniature movement of the actuator button, with the intention of producing a relatively large amount of high velocity motion of the electrical contacts in spite of the speed of actuation.
Micro switches are popular and their use is widespread. This is attributed to their relatively low cost, as well as high durability. They undergo more than one million cycles; for heavy duty models, this may go up to ten million cycles. There are many places and gadgets that require micro switches for proper functioning. Some of these areas include machinery, vehicles, industrial controls, appliances, and numerous other areas for control of electrical circuits. Some common but particular areas where micro switches are employed include the door interlock systems on microwave ovens, safety and levelling switches in elevators, detection of faults in photocopiers, such as paper jams, and vending machines. Miniature snap-action switches are frequently made use of in tamper switches on gate valves of fire sprinkler systems, in addition to other water piping systems. In this application, it is vital to be conscious of whether valve has been shut, or it is open.
Combined Lego Motor & Gearbox:
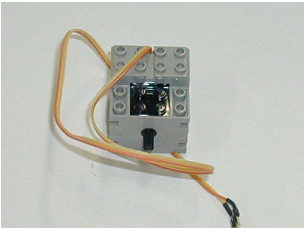
Figure VIII
There are DC motors that were provided in Lego kit. These motors are great for building robots in view of the fact that they are powerful and compact. They normally rotate at thousands of rotations per minute.
Nevertheless, most electric motors are in actual fact lacking in torque. In other words, this can be attributed to the fact that they cannot push incredibly hard. If hooked directly up to the motor’s shaft, we can note that it can hardly rotate the wheel, let alone nudge a whole robot.
Despite the fact that they have inadequate torque, what they do have in plenty, is speed. In reality, if the shaft is running freely, it can rotate at a rate of numerous thousands revolutions per minute. As a result, this speed is much faster than what one wants for a robot to drive in any case. Therefore, we could do with gearboxes with the intention of trading some of this unnecessary speed for additional torque.

Figure IX
The LEGO system is composed of a wide range of gears with varying functions (Brooks, 1986). On the other hand, for universal purposes, 8, 24, and 40-tooth gears can be employed. These are the easiest and most efficient to utilize of the group for the reason that their diameters are selected, such that they can be interlocked with one another at standard LEGO distances.
Through gear reductions, one is able to translate speed into torque (or the other way round by application of this technique in reverse). Suppose an 8-tooth gear is employed in turning a 24-tooth gear. Given that the smaller gear is required to rotate three times in order to turn the large gear once, the axle with the 8-tooth gear spins faster than the other.
As a result of this exchange for this reduction in speed, the axle is now able to apply three times as much torque. Consequently, this generates a gear reduction ratio of 3:1. This implies that we are relinquishing a factor of three of speed and swapping it over for production of three times the torque.
Lego parts
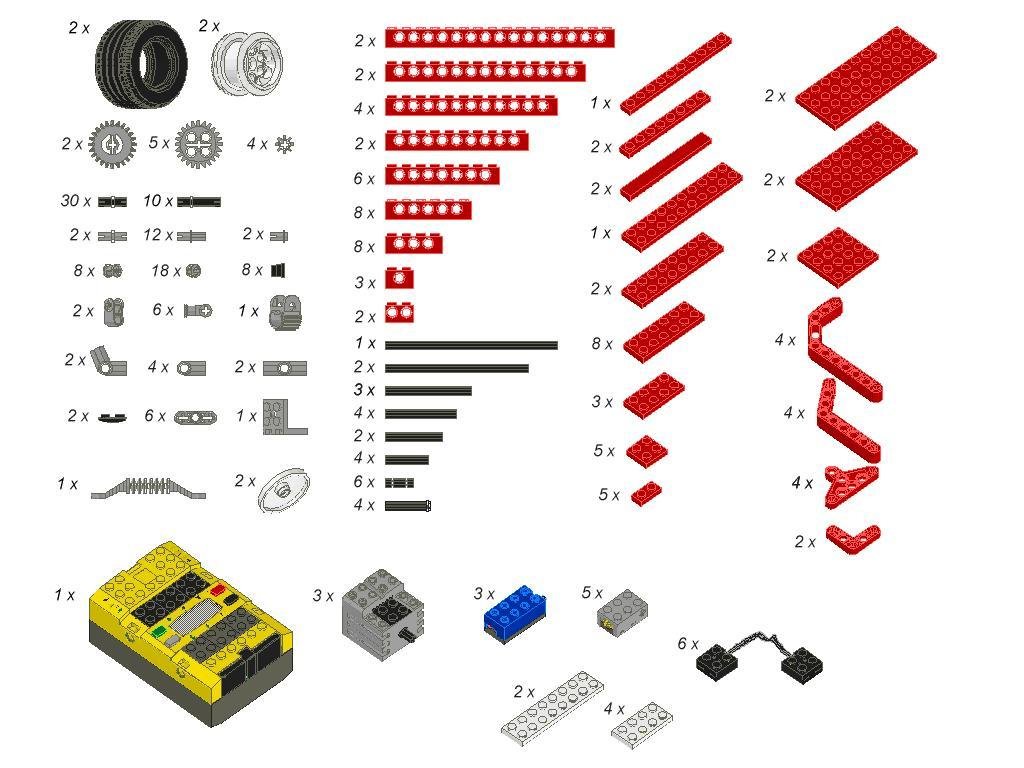
Figure X
Each component of the LEGO has its work cut out for it (Overmars. 2000). A number of those components are available and are simply used to join two parts that are not able to be stick together with one another.
A number of other parts, for instance rollers, are supposed to hook up the wheels with a few other parts of the robot with the intention of making the wheels move with mush ease. What is more, a number of parts are large in size, which could be utilized as the base of the robot; therefore, we could place many parts on.
In addition, they could be used to connect parts that are relatively far away in distance from each other. A good number of the components that we employed in the creation of our robot were the thick red bars and long red bars that assisted us in connection between the wheels.
Into the bargain, we used the big bars that have a large area to make use of it as the base of our robot. Furthermore, we could include on those big bars with the broad areas handy board, the battery, and a number of small components that could furnish a better look to our robot. In addition, we made use of the linking parts to a large extent that is on grey to join the parts which we experienced a few difficulties in connecting them together.
Assembly Part – (Name of team member who did this part)
Grabbing Mechanism
The hardest part of the whole project was finding a solution to the problem of grabbing flip over the puck. So as to come across a superior and realistic arm, we stumbled upon a possible like way out on the internet (Williamson, 1998).
The ultimate form of the grabbing piece of equipment has two motors; the work of one of the motors was to spin the arm, while the other motor had to push the meteorite aside.
Chassis
The chassis had to have enough strong in order to give support to handy board, batteries, and all the other sensors that the robot needed.
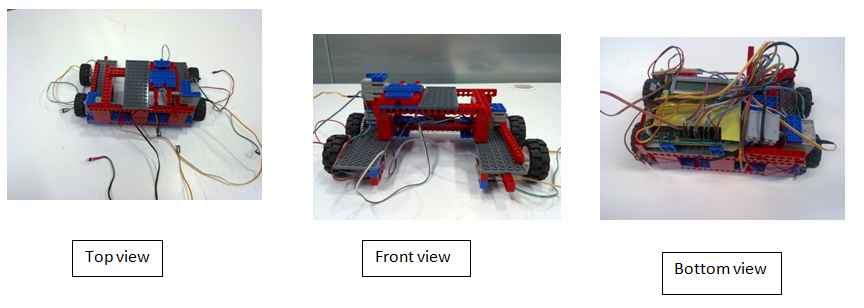
Figure XI
Sensors (Name of team member who did this part)
It is worth noting that sensors are the most significant components of the robot (“How to Make a Robot – Lesson 7: Using Sensors”, 2011). When robots have them, they are able to feel, look at and make out the disparity in their surroundings.
To enable the robot to verify whether there existed a puck or meteorite in the vicinity of the loading area, we employed one blue led as well as one phototransistor. The purpose of the blue LED was to give off a light beam that would be used by the phototransistor.
There are cases when the beam light would be broken; this means that a puck or meteorite is in the loading region. After verifying this and finding a puck in the region, the function of the second phototransistor was to verify the colour of the puck.
Readings ranged from 50 to 185 for the red puck. On the other hand, readings were larger than 200 for blue puck. The function of the third phototransistor was to rummage around for the base light with the intention of finding a way back to the base. In case the indicated value was less than 10, this showed the correct direction to the base.
An infra red (IR) emitter/detector was made use of with the purpose of determining the exact location of the base. In case the indicated value was higher than 236, then the location of the black line and subsequently, the location of the goal area was illustrated.
In addition, the Infra red (IR) range finder was employed in the verification of the ultimate position of the goal area. Lastly, the 4 micro switches were used to “feel” the obstacles as the robot moved around.
Motors and the Motor drive mechanism
As a result of restriction on the available materials and constituent parts of LEGO, the drive mechanism was made to order for two motors.
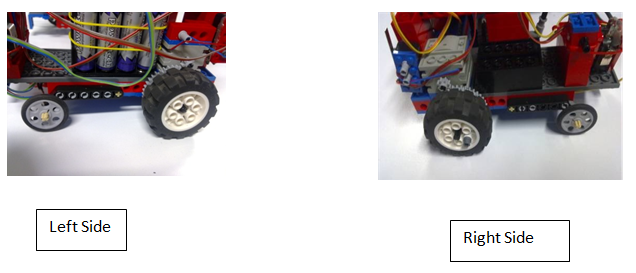
Figure XII
The steering mechanism of the robot was very heavy. The robot used big wheels at the front, and small ones at the rear.
The option of making use of rear small wheels was attributed to minimising friction, as well as having a good manoeuvrability. The robot created had major strength; it was very robust. The robustness of the robot ensured that it continued to manoeuvre in every environment it was subjected to.
Conclusion
This project report has covered all the things the team worked on in the hope of producing a successful robot. In addition, the report also looked at the constituent parts that were used to create the robot, and how the team employed them with the aim of building a physically powerful and innovative robot that could not be easily damaged or broken.
In addition to that, the project report offers a number of concise ideas in relation to the Interactive C (IC) program and the Handy board. The IC program was used to program the robot so that it could be able to perform the mission as the team wanted it to do.
I believe that this activity was an extremely interesting experience. The fact that were could be responsible for creation of a robot that could do a fine job by holding a verifying, collecting and putting a puck in its rightful place as the required by the task.
The only initial challenge we faced was the manner in which we could thrust the arms of the robot into the exact place, and how the team could make them turn. This was soon overcome and the team successfully completed the task.
References
Brooks. R.A. (1986) A robust layered control system for a mobile robot. IEEE Journal of Robotics and Automation, RA-2:14–23.
“How to Make a Robot – Lesson 7: Using Sensors.” (2011) Go Robotics. Web.
Jones, J.L., Flynn, A. M. and Seiger, B.A., 1999. Mobile Robots: Inspiration to Implementation. Massachusetts: A K Peters, Ltd.
Martin, F.G., 2001. Robotic Explorations: a Hands-on Introduction to Engineering. Massachusetts: Prentice Hall.
Martin, F.G.,1994. Circuits to Control: Learning Engineering by Designing LEGO Robots, doctoral dissertation, Program in Media Arts and Sciences, Massachusetts Inst. of Technology, Cambridge, Mass.
McKerrow, P.J., 1993. Introduction to Robotics. Boston: Addison-Wesley.
Overmars, M., 2000. Lego robots tips and tricks. Web.
Papert S. and Harel, I. eds.,1991. Constructionism. Westport, Conn.: Ablex.
Sutton, R.S. and Barto, A.G.,1998. Reinforcement Learning: An Introduction. Cambridge, Mass.: The MIT Press.
Williamson, B., 1998. The Lego: FetchBot. Freelug. Web.