Aims
This report aims at articulating the various aspects of image processing using MATLAB. The paper has also focused on bringing out the various functions that are useful in the transformation of an image during processing.
“Whos” Command
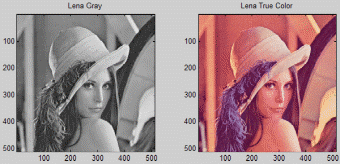
The MATLAB “whos” command is used to display information from every kind of data in the MATLAB workspace. After reading the coloured and greyscale Lena image using the “imread” function, it is typed in the command window which displays information on name, size, no of bytes and the class, each in its column.

The name column shows the name of every variable currently in use on MATLAB. For instance, if we load two variables, Lena Gray and Lena True, MATLAB will display the two under the name column. Size is the second attribute associated with the variables displayed as a result of the “who’s” command. In our case, the Lena Gray image whose size is 512×512pixels has been stored in an array of storage equal to the same size of 512× 512. It should also be noted that the true colour of the Lena image has been stored in the variable Lena True which has a different size from that of Lena Gray (Maria & Costas 729). This is because Lena True colour image contains information about red, green and blue intensities, or simply put the colour information for every pixel. The size of the Lena True image is also 512×512pixels but the size of the array storing the information of this image is three times greater than that of the original. The reason for this is that when MATLAB reads a true colour or an RGB image it retrieves information about all the three intensities, i.e., Red, Green and Blue and then stores this information in separate matrices. This is therefore a three-dimensional matrix or array which has 512×512 for all the three colours (RGB) hence a resultant array of 512 ×512×3. In the third column, we have information on the number of bytes consumed or occupied by a particular array (Russ 13).
The Lena Grayscale image of 512×512 pixels is the eighth bit of the greyscale image. Therefore, every pixel consists of 8 bits or 1 byte hence 512×512×1 bytes which are equal to 262144 bytes. The true colour of the Lena image has the same size but should hold information about the three intensities, i.e. the Red, Green and Blue. Each form of intensity requires 1 byte hence 512×512×3×1 =786432 bytes will be stored in the memory. The fourth column shows the class or category of the variable stored in MATLAB. The indicated class of the variables “unit8 array” for both images means that the images are of the type of the array or matrix and the data type which is stored in this array is unit8 or un-signed 8-bit data. Just as every greyscale value in the greyscale image or RGB intensities in the true colour image are represented by levels from 0 to 255 (all unsigned positive integers) so a data type for the values stored in the array/matrix is un-signed 8 bit. If there were a greyscale image with 65536 Gray levels, then MATLAB would have stored it in an array of unsigned integers of 16 bit or unit16. Other data types are single and double that is used for storing floating-point data, int8 for storing both positive and negative integers from -128 to 127 and logical or binary data types (Russ 147).
Three types of images are supported by MATLAB and they are numbered as follows:
- Indexed Images
- Intensity Images
- RGB or True Colour Images
An indexed image consists of two parts or is described by two matrices; the data and the colour map (Russ 580). The colour map matrix is m × 3 array carrying information about the colours in the image. The numbers stored in the colour map matrix are floating-point values ranging from 0 to 1 hence the class of this matrix is double. Every row of the colour map matrix indicates the Red, Green and Blue components of a single colour in the colour map matrix. Therefore the colour of the pixel P (i, j) in the image is determined by the index of the colour stored in the ith and jth column of the data matrix. The integer value will point or act as an index of the colour in the colour map matrix. If for example a value of 10 is stored in the data matrix at (i, j), the colour information stored at the 10th row of the colour map will be used to determine the colour at (i, j).
Intensity Images
An intensity image on the other hand is one in which the data matrix represents the intensities or pixel colours within some given range. Every element of the data matrix represents the colour of a single-pixel at that point. The images are represented by the matrix of class double, i.e. uint8 or uint16. To display the intensity image, the “images-c” function of MATLAB is used where the range of the intensity values to be displayed can be specified as either upper or lower limit. In addition to these limits, a different colour map supported by MATLAB can also be used to display the image. Examples of colour maps are Gray, winter, bone, hot, cool and pink. In this case, the “images-c” function maps the lower limit to the first entry in the colour map and the upper limit to the last entry while the rest are linearly mapped.
RGB or True Colour Images
Finally, the RGB (Red, Green and Blue) or the True Images are represented by three matrices namely Red, Green and Blue. An image of size m × n for example will be represented by a matrix having dimensions m×n×3. The colour at any pixel P (i, j) is defined by the colour information retrieved from the three matrices (RGB) or simply put, the colour at that point is a combined effect of the intensities of three colours at that point (Maria & Costas 745). The RGB are 24 bits pixel depth images where each of the three components is 8 bit. This in turn gives 16 million different colours and colours of real life objects that can be closely represented by this huge variety of colours, hence named True Colour images. MATLAB supports RGB images of class double, uint8 and uint16.
Give an example of reading an indexed image from a file
The MATLAB function “im-read” is used to read an indexed image from an image file. The indexed image can be read using the “im-read” function as follows: -Taking Lena True colour image as an indexed image.
[Lena, Cmap] = imread(‘lena.colour.tif’);
Here the colour map for the image will be stored in the variable matrix C-map while the matrix Lena will be storing the indices of colours at respective pixel positions.
The colours from the colour map matrix will be mapped according to the index value from The Lena matrix at the time of display. It should be noted that the colour map values in the original image will be automatically rescaled within the range of 0 to 1 while reading the image file.
Image storage classes supported by MATLAB
As a function of MATLAB “im-write” serves to store or save the image file into the memory. The general format is shown below.
Im-write (image_Matrix_Name,filename,format).
If an indexed image is to be written, then the information concerning the colour map and the Data matrix have to be specified. The format of the command is as follows.
Im-write (Data_Matrix,Map_Name,filename,format).
The im-put matrix to the “imwrite” function can be in the form of double class, unit8, unit16 or logical. In contrast the indexed image of class double, unit8 and unit 16 is the only one supported by MATLAB for the “imwrite” function.
It is also vital to note that the input class of the matrix to the function depends on the format defined for the output. Unit 16 classes of images are only supported by the PNG, TIFF and JPEG formats. With no proper output image format chosen, the MATLAB function is expected to indicate an error and would terminate the execution. MATLAB support all common formats for recording image files.
The differences (advantages and disadvantages) among “im-show”, “image” and “im-tool” for display
The three MATLAB functions named above are used to display object and image data. Each one of the functions has its merits and demerits as described below.
Im-Show
In this function, several options can display object and image data. The features of this function are displayed as shown below:
- The range of display can be specified using this function i.e., the upper and lower limit in which the greyscale image can be displayed. All the values that fall below the lower limit are mapped to zero or using a black pixel while those that are above the upper limit are mapped to 255 or using a white pixel. Other pixel values are displayed as intermediate levels on the greyscale. The feature is only applicable to the greyscale image.
- RGB or True Colour Images, Greyscale image, Black and White or Logical Images and Indexed are all applicable to this function.
- Using this function, the image file can be displayed directly by calling its name, provided that the files are in the directory or path of MATLAB. In carrying out this function, MATLAB first calls the “im-read” function to collect the image data then the image is displayed in the current figure. In this case, the image data file displayed will not be stored in the MATLAB workspace. The file is stored should be readable using the “im-read” function or else there will be an error.
- iii. The function is also known to support other properties and parameters that can be set while displaying the image. A border around the image can also be included and can be useful for displaying multiple images in a single figure object.
- A false “colour map” can also be used to display a greyscale image. The most commonly used colour maps are Bone, Pink, and cool, Hot, HSV and others. A complete list can be obtained in MATLAB help.
- Magnification is also applicable in this function and can enable a better view. However, there are some limitations to very high magnification because it might interfere with the resolution. The feature is only suitable within the display constraints as well as the docking style of the figure windows.
- Very large images can also be produced by this function through sub-sampling the image data. This is only applicable to TIFF image file formats.
- The “XData” “YData” with two values, can be used to define a new spatial coordinate system. This can be used for resizing the image during display.
Image
Just like the other functions, the image function is also used to display graphics and image data on the screen. The following are the properties of the function.
- Unlike the im-show and im-tool, the image function cannot read the file directly from the current directory of MATLAB. The function normally generates an error when an image file is accessed directly. The image data should be in existence in the MATLAB workspace where it can be stored in an array using the im-read function.
- The function only works with the RGB/True colour images or indexed images. The function does not support the greyscale or black and white images as in the im-show and im-tool functions. An indexed type greyscale image is displayed using such a function and additionally provides for a corresponding colour map.
- While displaying the image x and y-axis labels can be inserted. In real world features, this is very important, especially when representing them together with the image. For instance, using an image of one pixel to represent 5mm in the real world. Labels along the two axes would be altered to give the actual length.
Im-Tool
All the major features and properties shown by the imshow function apply to this function. Furthermore, the function supports other important features that are useful in the processing and analysis of the image.
- The function supports an overview of the image in the sense that the image can be zoomed in and aid in more desired views and analysis.
- The function allows adjustment of the image contrast.
- Access to pixel value information is possible in this function. Navigation through the image is also possible as more analysis is undertaken.
- The distance between two points on the image can be estimated using this function.
- Image information concerning class, type and measurement can be observed in this function. Flexibility in the analysis process is thus enhanced.
“LenaGray” and “LenaTrue” into indexed images
The Code is as follows
[LG , Cmap_Gray]=gray2ind(LenaGray,256);
[LT , Cmap_RGB]=rgb2ind(LenaTrue,256);
subplot 121;
subimage(LG,Cmap_Gray);
subplot 122;
subimage(LT,Cmap_RGB);
Image Addition
The imadd function operates in two ways; two images can be added, or a scalar value added to a single image. Therefore, when a scalar value is added the value sums up in every pixel thus generating the result. To increase the brightness of the image a value of 30 or 40 should be added to the image in variable K. It is the addition of 30 to every pixel value that makes some of the pixels equal to 255(white) while others were closer to the maximum value. Hence a white effect would result and a brighter image. Below is an illustration of the results obtained. The original image has been provided for comparison purposes
I = imread(‘rice.tif’);
figure;
imshow(I);
J = imread(‘cameraman.tif’);
figure;
imshow(J);
K = imadd(I, J);
figure;
imshow(K);
% My Part Starts here
bright_fact = 40
L = imadd(K, bright_fact);
figure;
subplot 121
imshow(K); title(‘Original’)
subplot 122
imshow(L); title (‘Brighter’)
Image Subtraction
rice = imread(‘rice.tif’);
background = imopen(rice, strel(‘disk’, 15));
rice2 = imsubtract(rice, background);
The first line indicates in the image file named rice can be read and stored as variable rice. In the second line of the code, the image has been opened morphologically to derive the background from the original image. The third line separates the background from the original image by the use of the “imsubtract” function. This results in the formation of rice2. It is also vital to note that the image rice, has an element of non-uniformity in terms of colour intensity as depicted in the background. Image subtraction, therefore, serves to eliminate non-uniformity hence creating a more homogenous background for the image.
Image Flipping
Imflip as a function, flips or rotates the image in a horizontal, vertical or diagonal plane. A simple error check has also been articulated. The code for the imflip function has been derived as indicated below:
function J = imflip(I,str)
if (isvector(I))
error (‘First input argument to the function should be a two dimensional array’);
end
if ~ischar(str)
error(‘Second input argument should be a character’)
end
J = I;
[m,n]=size(I);
if (str == ‘h’)
for i = 0:m-1
J(:,i+1)=I(:,m-i);
end
elseif(str == ‘v’)
for i = 0:n-1
J(i+1,:)=I(n-i,:);
end
elseif(str == ‘d’)
J (end :-1: 1)= I (1:end);
else
error(‘Flip direction can only have three values: h OR v OR d’);
end
The code for testing the flipping function is written below.
I = imread(‘LenaGray.png’);
H = imflip(I,’h’);
V = imflip(I,’v’);
D = imflip(I,’d’);
subplot 221;
imshow(I); title(‘Original’);
subplot 222;
imshow(D); title(‘Diagonally Flipped’);
subplot 223;
imshow(V); title(‘Vertically Flipped’);
subplot 224;
imshow(H); title(‘Horizontally Flipped’);
Following is the output of the above code shown in the figure.
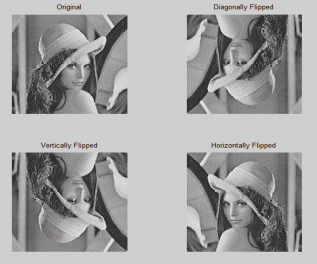
Image Resizing
The code for image resizing function with a factor of powers of two is given below.
function J = imenlarge(I,fact)
if (isvector(I))
error (‘First input argument to the function should be a two dimensional array’);
end
f= log2(fact);
if ~(isequal(round(f),f))
error(‘Factor should be a power of 2’);
end
K = I;
for p=1:f
[m,n]=size(K);
k = 1;
for i= 1:m
TMP(k,:)= K (i,:);
TMP(k+1,:)=K(i,:);
k = k +2;
end
tmp = TMP;
k = 1;
for i= 1:n
TMP(:,k)= tmp (:,i);
TMP(:,k+1)=tmp(:,i);
k = k +2;
end
K = TMP;
end
J = K;
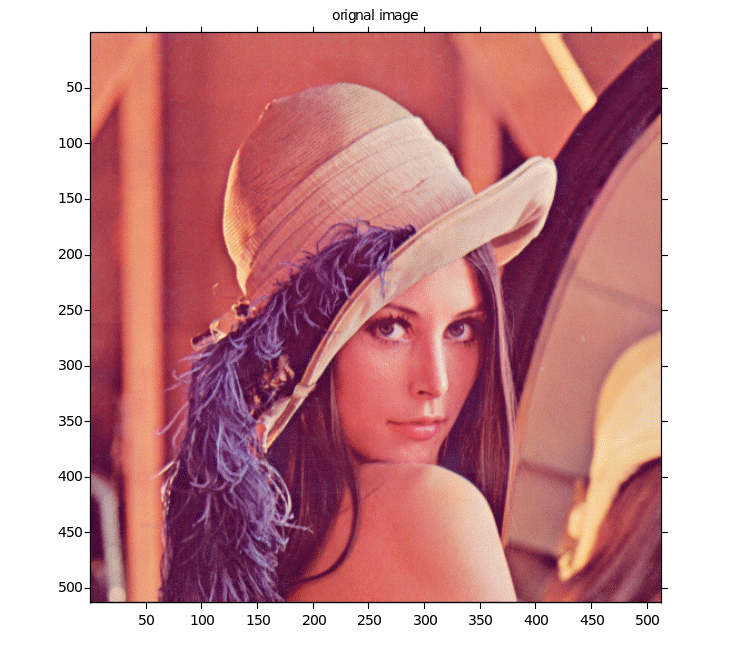
Another code
function []=imenlarge(filename,factor)
%checking input
if (nargin < 2)
errordlg(‘arguments not specified’);
end
fid = fopen(filename, ‘r’);
[a,b] = log2(factor);
if (fid == -1)
if ~isempty(dir(filename))
errordlg(‘Can”t open file for reading’,’error’);
else
errordlg(‘File does not exist.’, ‘error’);
end
elseif a~=0.5
errordlg(‘factor is not power of 2’, ‘error’);
else
imagee = (imread(filename));
t=ones(factor,factor);
if (ndims(imread(filename))==3)
e_image(:,:,1)=uint8(kron(double(imagee(:,:,1)),t));
e_image(:,:,2)=uint8(kron(double(imagee(:,:,2)),t));
e_image(:,:,3)=uint8(kron(double(imagee(:,:,3)),t));
imshow(e_image);
else
e_image=uint8(kron(double(imagee),t));
end
imwrite(e_image,’eimage.jpg’,’jpg’);
figure(1);
imshow(imagee);
title(‘orignal image’);
axis on;
figure(2);
imshow(e_image);
axis on;
title(‘enlarged image’);
end
Testing
imenlarge(‘lena.colour.tif’,2)
Original image
Enlarged image

Un-sharp Mask
The code for the unsharp mask is listed below.
function Y = unsharp(X,fact_a)
X = double(X);
if (isvector(X))
error (‘First input argument to the function should be a two dimensional array’);
end
if ~(fact_a >= 0 && fact_a <= 1)
error(‘Factor “a” should be within the range 0 to 1’);
end
h = fspecial(‘average’,5);
Z = imfilter(X,h,’symmetric’);
Y = uint8(X+ fact_a.*(X-Z));
Image X Is produced in another form that is sharper by the function that has been derived above. The function works on the edges and sharpness of the image which can be changed by altering the value of a as indicated in the function. A value denotes a sharper image.

Conclusion
MATLAB is a very important tool in understanding image processing. The indexed images, intensity images and RGB images are the three fundamental image types that are used in MATLAB for image processing. Through MATLAB an original image transforms using different functions before a final changed image is formed with additional properties.
Works Cited
Petrou, Maria and Petrou, Costas. Image Processing: The Fundamentals. USA: John Wiley and Sons, 2010.
Russ, John. The image processing handbook. USA: CRC Press, 2007.