Introduction
When we refer to mechanical properties of materials, whatever crosses the mind is the stress-strain curve. Ideally, both shear stress (σ) and strain (ε) testing are inevitable when it comes to material testing. While shear stress testing correlates an elongation force to the cross sectional area of a material, tensile testing subjects a material sample to a controlled tensional force until the yield point where the material fails.
The essence of performing these tests is that they aid in quality control, selection of a material meant for a specific application, and gives a glimpse of how a material would behave under varied forces. Importantly, the parameters obtained directly as a result of these tests are maximum elongation, definitive tensile strength and reduced cross-section area.
In a nutshell, from aforementioned parameters one is in a better position to determine the Poisons ratio, Young’s modulus (Ε), strain-hardening, and yield strength characteristics. Ideally, some of the parameters can easily be obtained from the graph of stress versus strain (stress-strain curve) graph as shown in the figure 1 below.
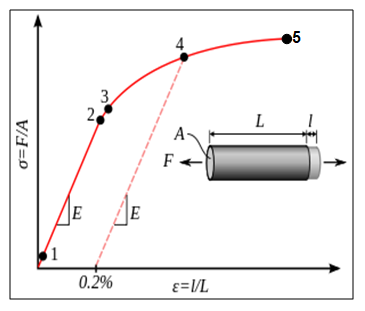
In simple terms, stress is the ratio of the elongation force to that of the cross sectional area whiles the stress is the ration of extension to that of the original length. From the graph (Fig. 1), one can obtain the Young modulus from the linear section of the curve by finding the gradient of the section (between 1 and 2).
Analyzing the graph in details, it is important to note that point 1 is the true elastic limit which coincides with the minimum stress that emanates from dislocations due to material movements (Egarmo, Black, & Kohser 2003). However, this parameter is hardly used in material science; nonetheless, it reflects a material’s chemical properties. Between points 1 and 2, the material obeys the Hook’s Law.
Between points 2 and 3, the material experiences elastic deformation. Finally, beyond point 3, the material is described as plastic since it has undergone permanent deformation and it rapture at point 5. It is worth noting that there are some other materials that have irregular linear sections. As such, an offset yield strength (point 4), 0.2% of the origin is plotted for the sake of material comparisons.
Other parameters that can be obtained from the graph are shown in the figure 2 and 3 below:
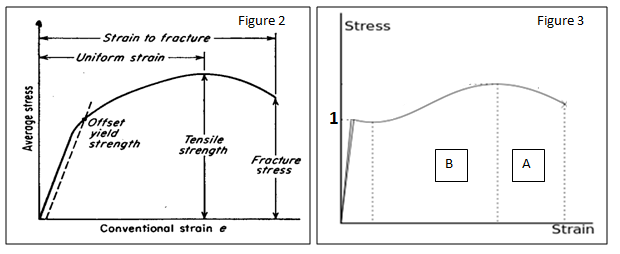
Basically, the tensile strength is the maximum stress while fracture stress is the stress at the fracture point. On the other hand, strain to fracture is the maximum strain at the point where the material fractures. Point 1 on figure 3 is the yield strength while sections A and B represent strain hardening and the necking region respectively.
It is significant to note that the y-axis of the stress-strain graph represents the strength properties while the x-axis represents the ductility properties. As such, figures 1 and 3 represent the typical trends of brittle (e.g. concrete) and ductile (e.g. steel) materials respectively.
Their respective behaviors are owed to the fact that brittle materials do not undergo strain hardening, consequently breaking without notice. In the literature that follows we are going to analyze a number of materials (carbon steels, aluminum, copper, perspex and LDPE (Low Density Polythene)) and classify them accordingly. The obtained data will then be compared to their actual properties in literature (Groover 2007).
Background literature
Material science is a multidisciplinary subject that incorporates both scientific and engineering aspects. To this end, it links the microscopic properties of a material at its molecular level to its larger macroscopic properties. In a synopsis, it encompasses both chemistry and applied physics.
This discipline is vital in many aspects of life, for instance, in aeronautical field, is significant in forensic engineering or failure analysis in case of an accident. Vitally, the physical properties exhibited by a material are a manifestation of the chemical composition, and the ensuing processes (thermal) that eventuated in the formation of a final product.
Basically, the ensuing thermal processes determine a sample’s micro-structure and hence its physical properties. With regards to the scope of this report, we will limit our analysis to carbon steels, aluminum, copper, perspex and LDPE.
Also known as carbon steel, steel is an alloy with the main trace element being carbon. The degree of carbon should; however, not be more than 2%. In essence, “the term carbon steel may be used to refer to steel that is not stainless steel” (Adelbert 1992). The degree of carbon concentration alters the physical properties of steel.
For instance, with an increased carbon concentration steel becomes less ductile, hard and stronger, and reduces welding ability. Nevertheless, the melting point decreases. Basing on the “carbon concentration, steel can be classified into four categories: low and mild carbon steel, medium carbon steel, high carbon steel and ultra-high carbon steel” (Alexander & Street1976).
Low and mild carbon steel represent steel with the lowest carbon concentrations, and the most commonly used in market. Basically, for these types, the carbon concentration is less than 0.6%. Vitally, low carbon steel (or A36) has a carbon concentration of approximately 0.05-0.3% while the mild carbon steel (1040) exhibits a concentration of roughly 0.3-0.6%.
As a consequence, this enhances the metal’s malleability and ductility characteristics. However, of the two, mild steel exhibits a relatively low tensile strength. Nonetheless, the tensile strength varies depending on the annealing temperatures and whether the metal is hot or cold rolled. To this end, A36 has a tensile strength of between 400-500 MPa while 1040 has roughly 520-590 MPa (Ashby & David 1992).
With a carbon content range of approximately 0.3-1.7% carbon steels can successfully undergo heat-treatment. These steels are referred to as high carbon steels and they include the medium, high and ultra-high carbon steels. Importantly, the trace elements are normally added to modify their properties. For instance, “sulfur makes steel crumbly and brittle at working temperatures” (Day 1988).
Moreover, manganese often increases ‘hardenability’ of these steels. Narrowing down to the specifics, medium carbon steel has a carbon content of approximately 0.3-0.59% by weight. As such, it balances strength and ductility, and it exhibits good wear resistance. As such, it is preferred in automotive industry.
With a carbon content of approximately 0.6-0.99% (4140), high carbon steel exhibits relatively high strengths thus, it finds application in springs. Finally, ultra-high carbon steel (1-2% carbon content) exhibits unprecedented hardness vital in making axels and knives.
Aluminum is among the world’s most abundant elements. As such, it accounts for 8.1% by weight of the total earth’s crust. Pure aluminum is a distinct metal that finds application in a diverse field. In essence, whatever makes aluminum distinct are its physical properties. Basically, “It is a soft, light, and gray metal that resists corrosion when pure in spite of its chemical activity because of a thin surface layer of oxide” (Bray 1947).
Moreover, it exhibits both malleability and ductility characteristics that makes it unsuitable for structural use. Ideally, the Young’s modulus “of pure aluminum is 10 x 106 psi, the shear modulus 3.8 x 10⁶ psi, Poisson’s ratio 0.33, and the ultimate tensile strength 10,000 psi, with 60% elongation” (Bray 1947). With these properties it finds application, for example, piping, cable sheathing and electric conductors.
Copper is an important element that has been mined for ages. In most cases, it is obtained as a by-product in the extraction of silver. This metal appears as a yellowish-red element. It has good electrical conductivity and hence finds application in electric industry.
Among the material properties is that it is ductile, malleable and tough. Chemically, it is resistant to rust. Basically, it has a modulus of elasticity that is equivalent to 117Gpa and a tensile strength of 200-400 Mpa.
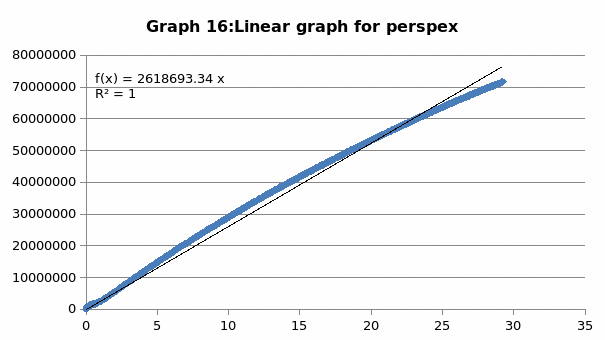
Perspex is a unique material that is distinguished by its clarity. It has unsurpassed light transmission ability. Moreover, it can come in a variety of shades. It exhibits durability in color retention irrespective of the condition that it is exposed to. Importantly, its mechanical properties are such that it is has a tensile strength of 75 MPa, has an elongation of 4% and modulus of 2.5 GPa.
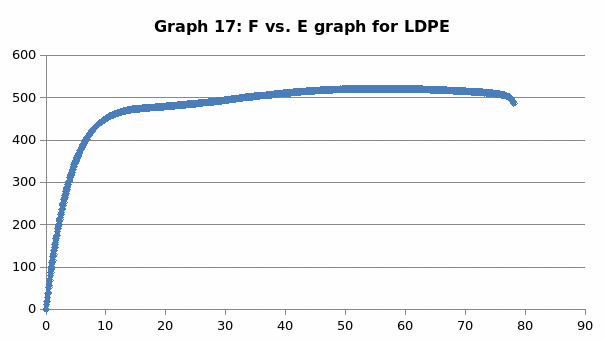
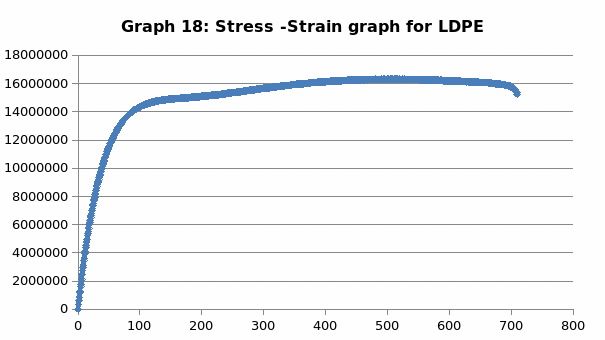
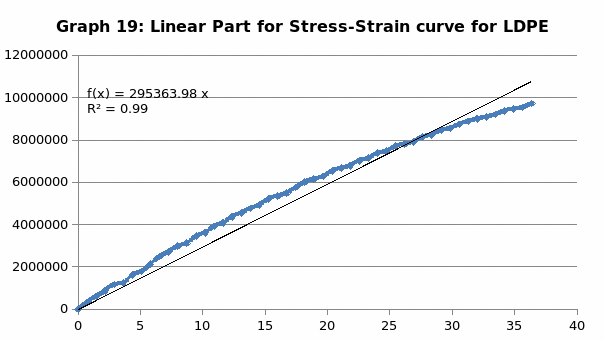
Finally, LDPE is the first ever synthesized polythene that was first processed in the year 1933. In appearance, they are translucent and thin in nature, and come in many shades. Notably, it has low crystallinity that is responsible for a low modulus of elasticity (200-400 MPa).
Moreover, it is highly ductile in nature in spite of a low temperature condition. As such, it elongates by 600-650% before it breaks. Its tensile strength is between 8-10%. With these properties, it finds application in the package industries, laboratories (wash bottles) and also in electronics industries (insulating circuits).
Experimental Procedure
In this experiment, a tensile test machine (Zwick-Roell 1474) was used. The materials to be tested were steels (at 0.1 and 0.8% carbon content) (diameter = 5.04 mm, length = 12.5 mm), pure aluminum (diameter = 5.04 mm, lenght = 12.5 mm), copper 12 (diameter 5.04 mm), perspex (32 mm thick, 10.22 mm width and 110 mm long) and LDPE (32 mm thick and 9.98 mm width and 110 mm long).
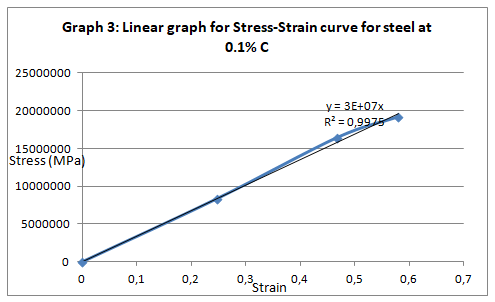
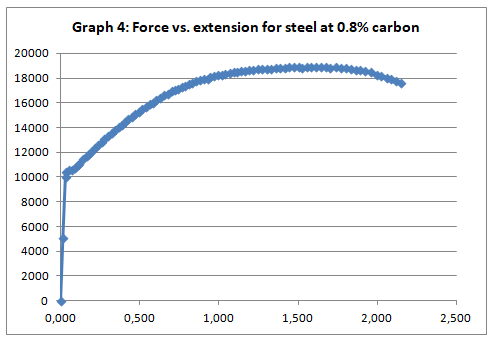
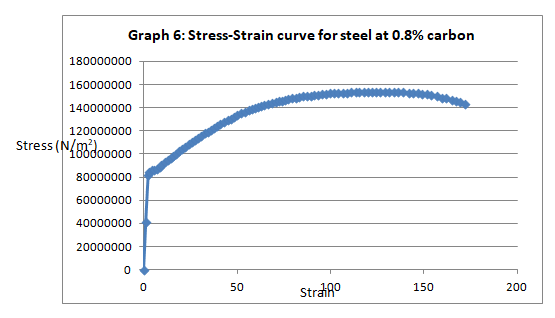
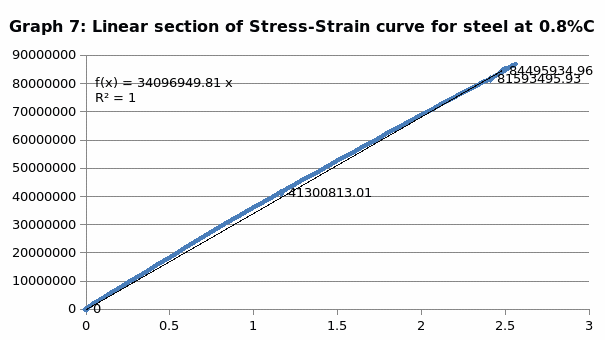
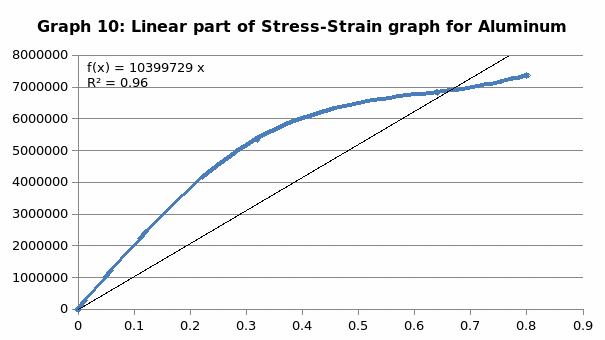
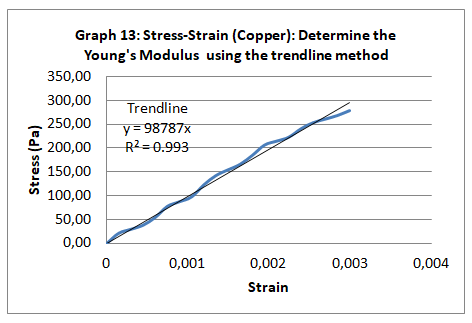
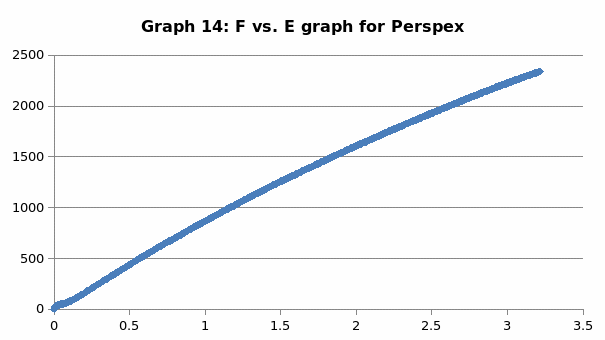
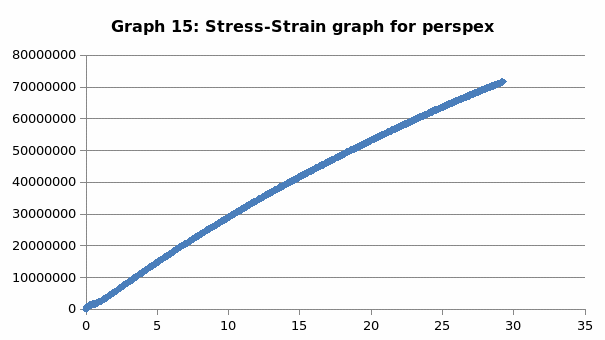
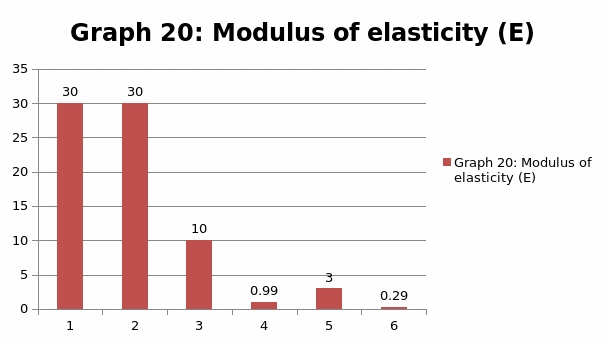
The parameters that were recorded include extension, force, stain and stress. From these parameters, graphs of force-extension, stress-strain, and the linear part of stress-strain were plotted. From the last graph, the values for modulus of elasticity were obtained and compared. Also, a bar graph comparing all the modulus was also plotted.
Results
The measured parameters are treated according to the formulae below:
- Stress = extension/original length = ∆l/l0
- Stress = Force/cross sectional area = F/C.A
The area A of a circle is given by ᴨr2 while that of a rectangular face is obtained from the products of thickness and width. It should be noted that all the units are in SI units.
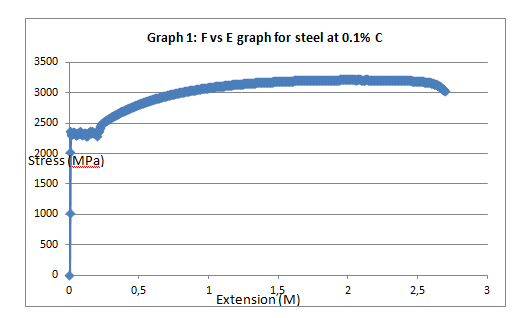
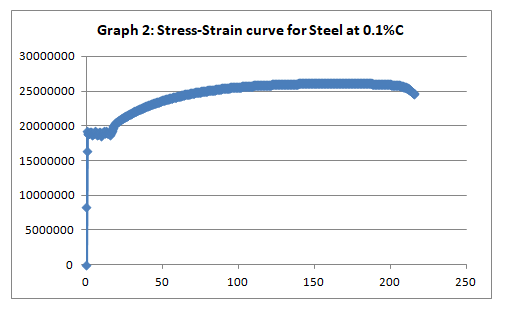
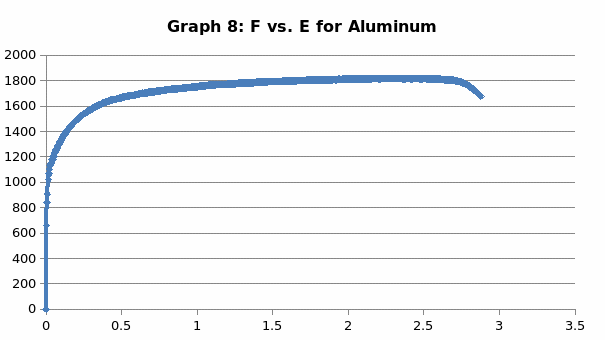
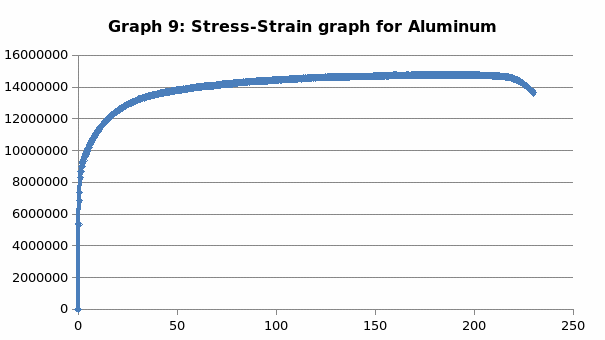
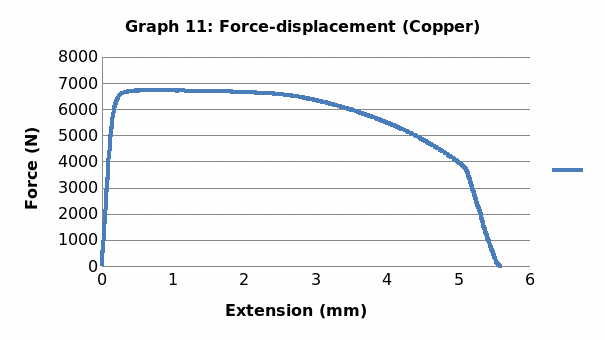
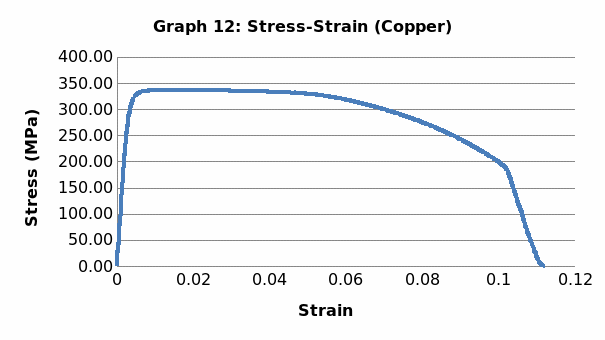
The below trends were obtained from the parameters obtained.
Discussion
The objective of this report was to analyze the mechanical properties of a number of materials including carbon steels (0.1 and 0.8% carbon), aluminum, copper, perspex and LDPE. The aim was to compare their modulus of elasticity and confirm that they agree with the literature values. From the analysis, it was confirmed that the experiment achieved its objectives.
To begin with, the trends of the curves exhibited the expected patterns. Like it was anticipated, low carbon steel (steel with 0.1% carbon) exhibited malleability properties attested by the presence of strain hardening section (Graph 2). On the other hand, steel with 0.8% carbon content exhibited a trend that is synonymous with the brittle materials (graph 4).
This was no exception to aluminum which is brittle in nature, and as such, it fractures without notice. Just like the low carbon steel, both copper and LDPE exhibited strain hardening before fracture. To this end, they are both malleable and ductile. Contrary to the other materials, perspex exhibited a prolonged elastic behavior without deformation. However, it breaks abruptly once the elastic limit is exceeded.
When we compare the modulus of elasticity, just like we anticipated, steel is the strongest of all the materials and this explains why it finds application in construction industry. On the other hand, LDPE is the weakest of all the materials, confirming why it finds application in the packaging industry.
Generally, the values obtained for the modulus of elasticity did not tally with the expected values. This could be attributed to experimental errors in the course of the experiment. One of the errors might have emanated from imprecise measurements because of the degree of accuracy of the measuring equipment. Future experiments ought to consider the use of computerized machines to take accurate data.
References
Adelbert, P M 1992, Materials of Construction: Their Manufacture and Properties, University of Wisconsin Press, Madison.
Alexander, W & Street A 1976, Metals in the Service of Man, 6th ed., Pelican Books, London.
Ashby, M F & David, J 1992, “Chapter 12”. Engineering Materials 2 (with corrections ed.). Oxford, Pergamon Press.
Bray, JL 1947, Non-Ferrous Production Metallurgy, John Wiley & Sons, New York.
Day, J 1988, “The Bristol Brass Industry: Furnaces and their associated remains,” Journal of Historical Metallurgy, vol. 22, no. 1, pp. 24.
Egarmo, E, Black, J T & Kohser, A 2003, Materials and Processes in Manufacturing (9th ed.). John Wiley & Sons, New York.
Groover, M P 2007, Fundamentals of Modern Manufacturing: Materials, Processes and Systems (3rd ed), John Wiley & Sons Inc., Hoboken, NJ.