Abstract
Modern manufacturing industries depend on metals for their production. Understanding metal forming and other properties of the commonly used materials like copper, normalized steel (NS-Black) and work-hardened steel (WHS-Silver) could help in the determination of their critical functional phenomenon. The tensile experiment studied parameters like strain fracture, tensile strength, yield stress, and elasticity (Young’s modulus). Findings were helpful for assessing the yield stress obtained from the graphical representation of the experiment and the existing theoretical values to evaluate the proof stress.
Introduction
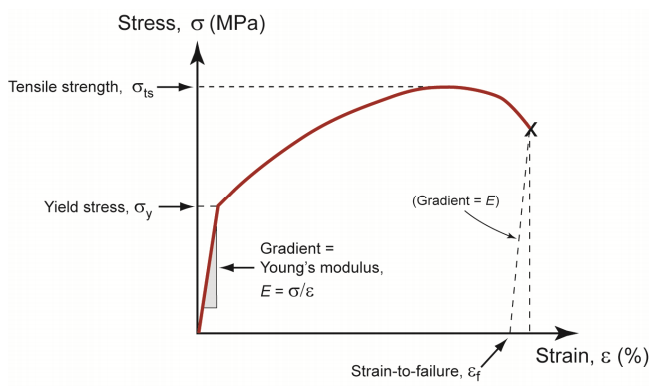
Production of semi-finished or finished metal material depends on forming properties of the metal selected for industrial application. Downstream production processes rely on the properties of the formed metal (Alexander & Brewer, 1963). Therefore, modification and alteration of microstructure by plastic deformation, heat treatment, or heating help in changing metal properties to a material amenable to product development as early described by Alexander and Brewer (1963). The behavior of copper, normalized steel (NS-Black) and work-hardened steel (WHS-Silver) under tensile load is an important functional phenomenon of a tensile experiment. Measurement of mechanical properties of the strain to fracture, the tensile strength, the yield stress, and the elasticity (Young’s modulus) provided information on their plasticity and fracture (figure 1 below). These results were helpful in examining how the mechanical properties were affected by stress. The finding showed that the discrepancy could have resulted from using the graphical representations to determine the yield stress. These results suggested that copper material was more ductile than steel material, which had a higher toughness. However, steel material exhibited a higher yield and tensile strength. These observations were necessary to distinguish brittle fracture and other features of ductility (Tarr, n.d).

Results and Calculations
Sample dimensions (mm)
Yielding stress
Normalised steel (NS-Black)


copper experiment


Work-hardened steel (WHS-silver)


Tensile strength
Normalised steel (NS-Black)


Copper experiment


Work hardened steel (WHS-Steel)


Ductility (strain-to-fracture)
Normalised steel (NS-Black)


Copper experiment


Work hardened steel (WHS-Steel)


Young modulus E
Normalised steel (NS-Black)


Copper experiment


Work hardened steel (WHS-Steel)


Yield strain
Normalised steel (NS-Black)


Copper experiment


Work hardened steel (WHS-Steel)


Graphical representation


Descriptions of graphs
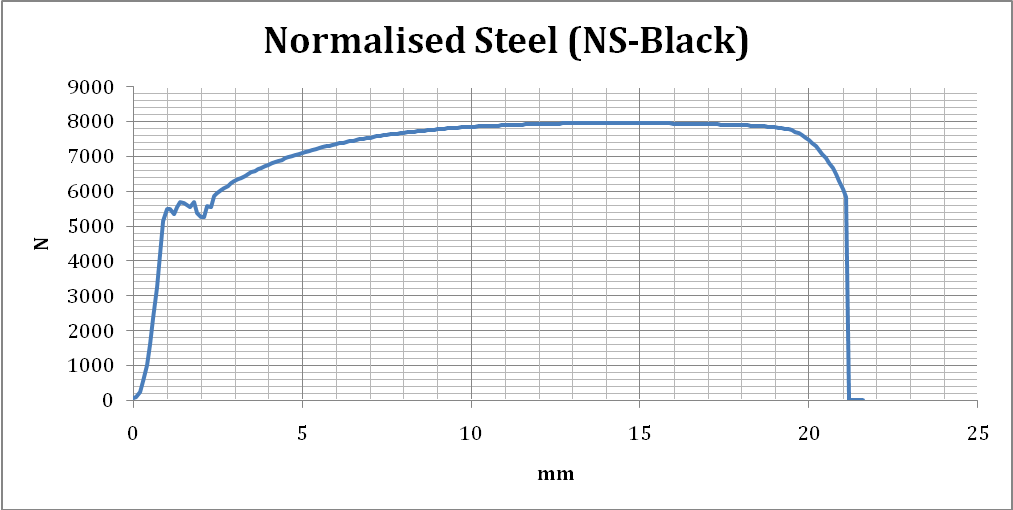
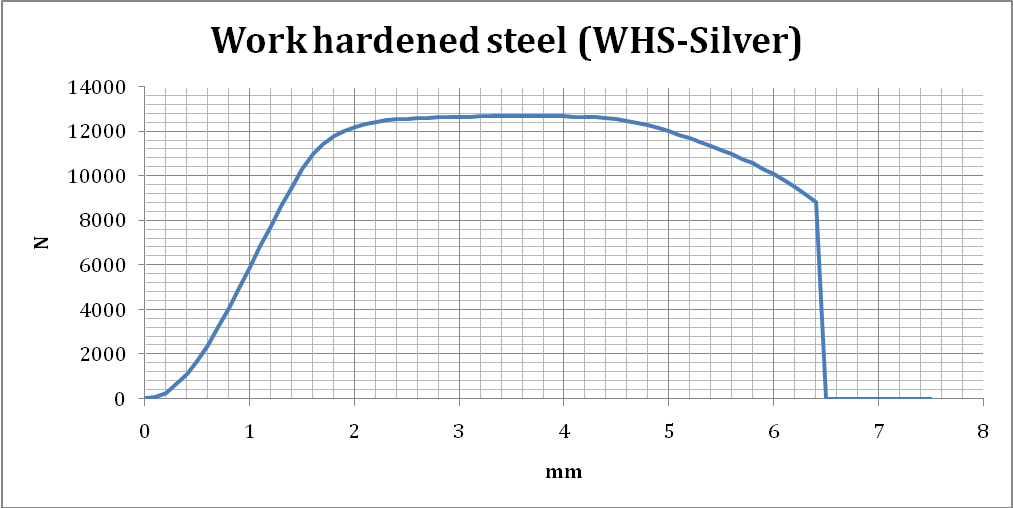
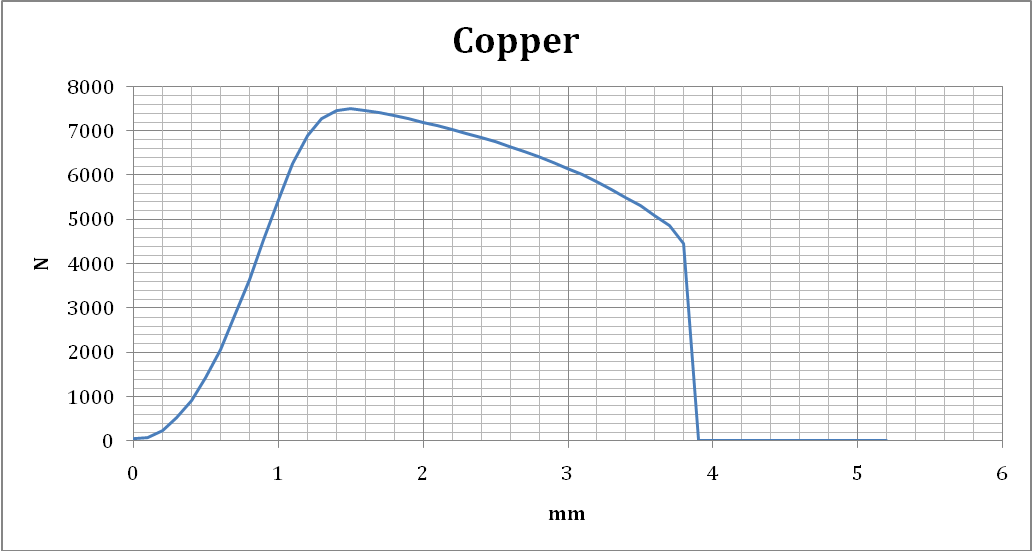
Graphical representation of figures 2, 3, and 4 show the findings of the stress-strain relationship of the three materials studied. Copper reported 445MP, work hardened steel gave 508MPa, while normalised steel has 536MPa tensile stress. With a proof stress of 0.1%, copper material exhibited a gradual yield making it different from the other two materials. Calculated elasticity modulus for these materials based on yield stress gave 26 Gpa for normalise steel, 66 Gpa for copper and 21 Gpa for work-hardened steel. Besides, the finding on elongation showed that normalised steel elongated by 3.5% after the experimental procedure. Analysis of the cross-sectional area demonstrated that the steel recorded a decline of 53.1% at the location of the fracture. However, copper underwent elongation by 6.5% while the cross-sectional area decreased by 25.9% at the site of the fracture.
The finding on copper yielding stress depicted a discrepancy in the experimental value obtained and the values listed in the engineering material. For instance, the experiment procedure got 200MPa, which was different from the 60MPa value in the engineering procedure. Such discrepancies were attributed to the fact that the analysis predicted copper yielding stress. Since the proof stress was the main component for the prediction of copper yield stress, there is a high likelihood that it could have an adverse impact on the authenticity of yield stress (Tarr, n.d). The other source of errors could include the reading obtained from the machine. In this experiment, the machine was not calibrated as advised by the instructor. The discrepancy between the yield stresses could have occurred because the graphical representations were used to determine the yield stress. The graphical representation presented clear and well-defined values for the high carbon steel as opposed to those of copper material. Proof stress was not appropriate for deriving the benefits because using it would give more accurate values with high confidence.
Determination of material modulus based on experimental uni-axial tensile stress may not reflect actual values, for this reason, the modulus is best determined through the measurement of sample natural frequency using oscillation test. Evaluating experimental modulus of elasticity, it is apparent that values in the engineering material were higher than those obtained from the experiment by one order magnitude. The engineering material quoted 124GPa for copper and 200GPa for steel.
Conclusion
These findings showed that copper material was more ductile than the steel material; copper had the highest toughness while steel material had the highest yield and tensile strength. However, when comparing copper and steel with equal elastic modulus, steel exhibited superior characteristics of tensile strength and yield stress than copper. The theoretical and experimental modulus values gave the indication that these results had lower confidence for the future referencing in related studies. However, these findings elaborated the importance of considering proof stress concept in the tensile analysis.
References
Alexander, J.M., & Brewer, R.C. (1963). Manufacturing Properties of Materials. Amsterdam: Van Nostrand Rheinhold
Tarr, M. (n.d). Stress and its effect on Materials. Web.